
Dynamic WLAN configuration for ESP32 Board | AutoConnect
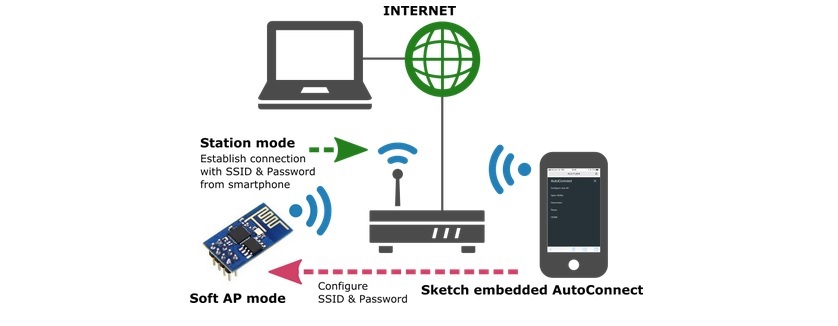
Today i am telling to you about Dynamic WLAN configuration for ESP32 Board. An Arduino library available for ESP8266/ESP32 WLAN configuration at run time with web interface. It is no needed hard-coding in advance the SSID and Password into the sketch to connect between. ESP8266/ESP32 and WLAN. You can input SSID & Password from a smartphone via the web interface at runtime.
To the dynamic configuration for ESP32 for joining to WLAN with SSID and PSK accordingly. It an Arduino library united with ESP8266WebServer class of ESP8266 or WebServer class of ESP32. Easily implementing the Web interface constituting the WLAN for ESP8266/ESP32 WiFi connection. With this library to make a sketch easily which connects from ESP8266/ESP32 to the access point at runtime by the web interface without hard-coded SSID and password.
Key points
No need pre-coded SSID & password – It is no needed hard-coding in advance the SSID and Password into the sketch to connect between ESP8266/ESP32 and WLAN. You can input SSID & Password from a smartphone via the web interface at runtime.
Simple usage – AutoConnect control screen will be displayed automatically for establishing new connections. It aids by the captive portal when vested the connection cannot be detected. By using the AutoConnect menu, to manage the connections convenient.
Store the established connection – The connection authentication data as credentials are saved automatically in EEPROM of ESP8266/ESP32 and You can select the past SSID from the AutoConnect menu.
Easy to embed in – AutoConnect can be embedded easily into your sketch, just “begin” and “handleClient“.
Lives with the your sketches – The sketches which provide the web page using ESP8266WebServer/WebServer there is, AutoConnect will not disturb it. AutoConnect can use an already instantiated ESP8266WebServer object(ESP8266) or WebServer object(ESP32), or itself can assign it.
Easily add user-owned web screen and parameters – You can easily add your own web screen that can consist of representative HTML elements as the styled TEXT, INPUT, BUTTON, CHECKBOX, RADIO, SELECT, SUBMIT into the menu. It can be invoked from the AutoConnect menu and parameters can be passed.
How to Use | How embed the AutoConnect to the sketches | Dynamic WLAN configuration for ESP32
Most simple approach to applying AutoConnect for the existing sketches, follow the below steps.

Required libraries
AutoConnect requires the following environment and libraries.
Arduino IDE
The current upstream at the 1.8 level or later is needed. Please install from the official Arduino IDE download page. This step is not required if you already have a modern version.
ESP8266 Arduino core
AutoConnect targets sketches made on the assumption of ESP8266 Community’s Arduino core. Stable 2.4.0 or higher required and the latest release is recommended.
Install third-party platform using the Boards Manager of Arduino IDE. Package URL is http://arduino.esp8266.com/stable/package_esp8266com_index.json
ESP32 Arduino core
Also, to apply AutoConnect to ESP32, the arduino-esp32 core provided by Espressif is needed. Stable 1.0.1 or required and the latest release is recommended.
Install third-party platform using the Boards Manager of Arduino IDE. You can add multiple URLs into Additional Board Manager URLs field, separating them with commas. Package URL is https://dl.espressif.com/dl/package_esp32_index.json for ESP32.
Additional library (Required)
The PageBuilder library to build HTML for ESP8266WebServer is needed.
To install the PageBuilder library into your Arduino IDE, you can use the Library Manager. Select the board of ESP8266 series in the Arduino IDE, open the library manager and search keyword ‘PageBuilder‘ with the topic ‘Communication‘, then you can see the PageBuilder. The latest version is required 1.3.2 later.
Additional library (Optional)
By adding the ArduinoJson library, AutoConnect will be able to handle the custom Web pages described with JSON.
Install the AutoConnect
Clone or download from the AutoConnect GitHub repository. hen in the Arduino IDE, navigate to “Sketch > Include Library”. At the top of the drop down list, select the option to “Add .ZIP Library…”.
How To use Autoconnect with ESP32 | Dynamic WLAN configuration for ESP32
Open the Arduino IDE, write the following sketch and upload it. The feature of this sketch is that the SSID and Password are not coded.
#include <ESP8266WiFi.h>          // Replace with WiFi.h for ESP32
#include <ESP8266WebServer.h>     // Replace with WebServer.h for ESP32
#include <AutoConnect.h>

ESP8266WebServer Server;          // Replace with WebServer for ESP32
AutoConnect      Portal(Server);

void rootPage() {
  char content[] = "Hello, world";
  Server.send(200, "text/plain", content);
}

void setup() {
  delay(1000);
  Serial.begin(115200);
  Serial.println();

  Server.on("/", rootPage);
  if (Portal.begin()) {
    Serial.println("WiFi connected: " + WiFi.localIP().toString());
  }
}

void loop() {
    Portal.handleClient();
}
The above code can be applied to ESP8266. To apply to ESP32, replace ESP8266WebServer class with WebServer and include WiFi.h and WebServer.h of arduino-esp32 appropriately.
After about 30 seconds, if the ESP8266 cannot connect to nearby Wi-Fi spot, you pull out your smartphone and open Wi-Fi settings from the Settings Apps. You can see the esp8266ap in the list of “CHOOSE A NETWORK…”. Then tap the esp8266ap and enter password 12345678.A something screen pops up automatically.
This screen displays the current status of the established connection, WiFi mode, IP address, free memory size, and etc. Also, the hamburger icon is the control menu of AutoConnect seems at the upper right. By tap the hamburger icon, the control menu appear.
Here, tap “Configure new AP” to connect the new access point then the SSID configuration screen would be shown. Enter the SSID and Passphrase and tap apply to start connecting the access point.
After connection established, the current status screen will appear. It is already connected to WLAN with WiFi mode as WIFI_AP_STA and the IP connection status is displayed there including the SSID.
For one, continues execution of the sketch while keeping this connection. You can access ESP8266 via browser through the established IP address after cancel to “Log in” by upper right on the screen.
Or, “RESET” can be selected. The ESP8266 resets and reboots. After that, immediately before the connection will be restored automatically with WIFI_STA mode.
The IP address of ESP8266 would be displayed on the serial monitor after connection restored. Please access its address from the browser. The “Hello, world” page will respond. It’s the page that was handled by in the sketch with “on” function of ESP8266WebServer.
Which are Board Supported ?
Generic ESP8266 modules (applying the ESP8266 Community’s Arduino core)
Adafruit HUZZAH ESP8266 (ESP-12)
ESP-WROOM-02
Heltec WiFi Kit 8
NodeMCU 0.9 (ESP-12) / NodeMCU 1.0 (ESP-12E)
Olimex MOD-WIFI-ESP8266
SparkFun Thing
SweetPea ESP-210
ESP32Dev Board (applying the Espressif’s arduino-esp32 core)
SparkFun ESP32 Thing
WEMOS LOLIN D32
Ai-Thinker NodeMCU-32S
Heltec WiFi Kit 32
M5Stack
And other ESP8266/ESP32 modules supported by the Additional Board Manager URLs of the Arduino-IDE.
I hope you like this post “Dynamic WLAN configuration for ESP32”. If have you any query please write in comment box. And you can share this post “Dynamic WLAN configuration for ESP32”.
POST Credit : Umawati Nikam
You may like also:
- 6LoWPAN | ZigBee | 6LoWPAN Vs ZigBee
- DHT11 sensor with ESP8266/NodeMCU using Arduino IDE
- Arduino IDE | Arduino | Open Source Hardware/Softawre | Arduino Vs RPi
- How To Create Secure MQTT Broker
- MQTT Servers/Brokers
- MQTT Products (that use MQTT)
- MQTT Public Brokers List
- IoT Data Protocols
- Setting up Authentication in Mosquitto MQTT Broker
- VerneMQ – Clustering MQTT for high availability and scalability

Pingback: WiFi LoRA 32 (V2) ESP32 | Overview | Introduction
Pingback: Installing the ESP32 Board in Arduino IDE | ESP32
Pingback: Getting Started with the ESP32 Development Board
Pingback: Using Node js and Arduino with LED Blinking Program
Pingback: Development Tools for ARM based MCUs - Explainer
Pingback: IFTTT Alternatives To Automate Your Online Workflow 2019 | IFTTT ?
Pingback: Install Ubuntu Core on Raspberry Pi 2 or 3 - IoTbyHVM
Pingback: ESP32 BLE Tutorials | How to use ESP32 with BLE
Pingback: ESP8266 PWM Example - IoTbyHVM - Explore TechBytes
Pingback: GPIO pins of ESP8266 and How to use efficiently -IoTbyHVM
Pingback: InfluxDB | Installation | How To Use | Time Series Database ?
Pingback: ESP32 LoRa Tutorial - IoTbyHVM - Explore TechBytes
Pingback: Heroku | How To use | Getting started with Heroku ...
Pingback: RFID Reader MFRC522 interface with NodeMCU using Arduino IDE
Pingback: IoT Protocols and Communication APIs - IoTbyHVM - Bits & Bytes of IoT
Pingback: Best IoT Platforms for building IoT projects - IoTbyHVM
Pingback: DDoS Attacks | Common Types of DDoS Attacks
Pingback: ATOMIC Pi - A high power alternative to RPi - IoTbyHVM
Pingback: Logical Design of IoT | IoT Communication Models & APIs
Pingback: Arduino SPI Tutorial - IoTbyHVM - Bits & Bytes of IoT
Pingback: NodeMCU ESP8266 OTA (Over-the-Air) using Arduino IDE
Pingback: Espressif Announces the Release of ESP32-S2 Secure Wi-Fi MCU
Pingback: Portable OS - Your pocket operating systems - TopX
Pingback: ArduinoJSON - Efficient JSON serialization for embedded C++
Pingback: LED using Blynk and ESP8266 (Node MCU) - IoTbyHVM
Pingback: Program Your Arduino With an Android Device - IoTbyHVM - Bits & Bytes of IoT
Pingback: GPS Module Interfacing with NodeMCU ESP8266 - IoTbyHVM
Pingback: NodeMCU ESP8266 with DHT11 and Firebase Real-Time Database
Hello Harshvardhan Mishra, I’m Klaus, a beginner with ESP programming and I’m working on a github project to provide a serial to wifi bridge for 3D printers. Hopefully I can ask you a question. The project is here https://github.com/MajenkoProjects/WiFiSerialDTR which I found really usefull. Standalone I works really good, but my problem is the hardcoded wifi configuration. I already tinkered arround with your code snippe from here. My knowöedge is really low and I want to make configuration with AutoConnect. I’m now lost, because of not getting AutoConnect implemented in the the code I use. I would appriciate your help to get it done with your support. Thank you very much in advands Klaus
Pingback: GPIO Pins of ESP32 | ESP32 Tutorials - IoTbyHVM - Bits & Bytes of IoT
Pingback: World's First LoRa SoC : STMicro STM32WLE5 - IoTbyHVM
Pingback: openEuler | Huawei Releases openEuler, A CentOS-Based Linux Distro
Pingback: IoT OS and RTOS for Internet of Things Devices - CompileIoT
Pingback: Top 10 IoT Cloud Platforms - CompileIoT
Pingback: IoT Sensors and Actuators - CompileIoT - Explore Internet of Things
Pingback: RAK7246 LoRaWAN Developer Gateway Features Raspberry Pi Zero W
Pingback: Controlled LED by Google voice assistant -IoTbyHVM
Pingback: Interface LDR module with NodeMCU - IoTbyHVM - Bits & Bytes of IoT
Pingback: Raspberry Pi keyboard and hub - IoTbyHVM - Bits & Bytes of IoT
Pingback: Top IoT Operating Systems in 2020 | IoT OS and RTOS
Hi –
I loaded the code; compiled and ran it.
The Serial monitor gives a sensible response:
“WiFi connected: 192.168.1.8”
However, I cannot find the 8266 (or anything else new) in the list of available WiFi networks on either my phone, my Windows 8 laptop, or my Ubuntu desktop computer.
I also don’t see any “Hello World” message anywhere.
What am I doing wrong?
– Matt
Hello,
I am new to this field. I am using esp32 development board. I want to use Autoconnect menu for my iot application but i am unable to use it with the example you have shown. Even i tried with different codes as well. As soon as i am connecting to the esp32ap a notification is showing “sign in to esp32”. Once hiting it, the Autoconnect page is not popping up automatically instead it is redirecting to url http://captive.apple.com.
Can you suggest how to overcome this problem.
Pingback: Getting Started with ESP32 with Arduino IDE - IoTbyHVM
Pingback: IoT Sensors and Actuators - IoTbyHVM - Bits & Bytes of IoT