Getting Started with the ESP32 Development Board
In this post we talk about “Getting Started with the ESP32 development board”. If you’re familiar with the ESP8266, the ESP32 is its sucessor. The ESP32 is loaded with lots of new features. The most relevant: it combines WiFi and Bluetooth wireless capabilities and it’s dual core. Some Boards comes with LoRa such as WiFi LoRA 32 (V2) ESP32 | Overview | Introduction.
Find the differences between the ESP32 and the ESP8266: ESP32 vs ESP8266 – Pros and Cons
In this post, we’ll be using the ESP32 DEVKIT DOIT board as a reference. But the information on this page is also compatible with other ESP32 development boards with the ESP-WROOM-32 chip.
ESP32 chip specifications –
- The ESP32 is dual core, this means it has 2 processors.
- It has Wi-Fi and bluetooth built-in.
- It runs 32 bit programs.
- The clock frequency can go up to 240MHz and it has a 512 kB RAM.
- This particular board has 30 or 36 pins, 15 in each row.
- It also has wide variety of peripherals available, like: capacitive touch, ADCs, DACs, UART, SPI, I2C and much more.
- It comes with built-in hall effect sensor and built-in temperature sensor.
Programming Environments
The ESP32 can be programmed in different programming environments. You can use: Arduino IDE, Espressif IDF (IoT Development Framework), Micropython, JavaScript, LUA etc.
Installing the ESP32 Board in Arduino IDE
First install or update latest Arduino IDE from arduino.cc/en/Main/Software. There’s an add-on for the Arduino IDE allows you to program the ESP32 using the Arduino IDE and its programming language. Visit this: Installing the ESP32 Board in Arduino IDE
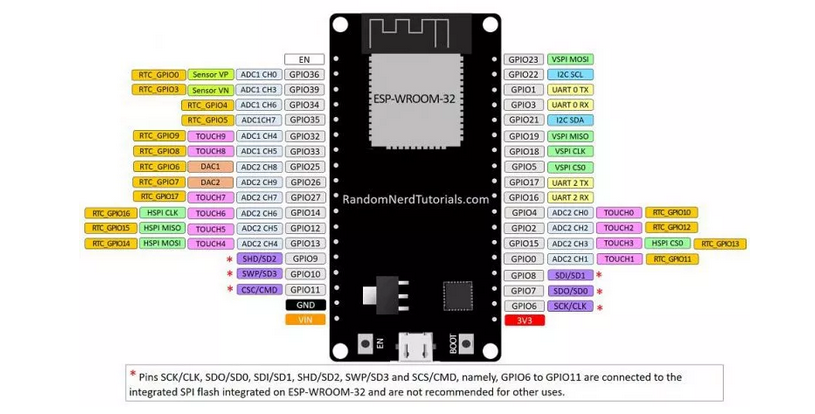
ESP32 Pinout
The ESP32 has more GPIOs with more functionalities compared with the ESP826. With the ESP32 you can decide which pins are UART, I2C, or SPI – you just need to set that on the code. This is possible due to the ESP32 chip’s multiplexing feature that allows to assign multiple functions to the same pin. If you don’t set them on the code, the pins will be used as default
Version with 30 GPIOs
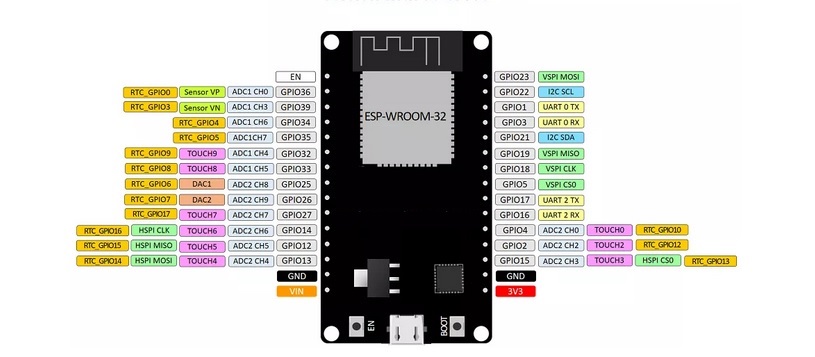
Version with 36 GPIOs
Getting Started with the ESP32
Upload Code to the ESP32 using Arduino IDE
Upload code to your ESP32 board, we’ll build a simple example to blink an LED. Copy the following code to your Arduino IDE:
/*
  Blink
*/

// ledPin refers to ESP32 GPIO 23
const int ledPin = 23;

// the setup function runs once when you press reset or power the board
void setup() {
  // initialize digital pin ledPin as an output.
  pinMode(ledPin, OUTPUT);
}

// the loop function runs over and over again forever
void loop() {
  digitalWrite(ledPin, HIGH);   // turn the LED on (HIGH is the voltage level)
  delay(1000);                  // wait for a second
  digitalWrite(ledPin, LOW);    // turn the LED off by making the voltage LOW
  delay(1000);                  // wait for a second
}
In this code, we’re controlling an LED connected to GPIO 23.
const int ledPin = 23;
Plug your ESP32 development board to your computer and follow these next instructions:
1) Go to Tools > Board, scroll down to the ESP32 section and select the name of your ESP32 board. In my case, it’s the DOIT ESP32 DEVKIT V1 board.
2) Go to Tools > Port and select a COM port available.
3) Press the upload button.
If you get the following error when trying to upload code, it means that your ESP32 is not in flashing/uploading mode.
Failed to connect to ESP32: Timed out… Connecting…
To upload code, you need to follow the next steps (make sure you have the right board selected:
- Hold-down the “BOOT” button in your ESP32 board
- After you see the “Connecting….” message in your Arduino IDE, release the finger from the “BOOT” button:
- After that, you should see the “Done uploading” message.
That’s it. After uploading the new sketch, you can press the “ENABLE” button to restart the ESP32 and run the new uploaded sketch.
After uploading the code, the LED connected to GPIO 23 should be blinking every other second.
I hope you’ve found this post “Getting Started with the ESP32″useful. Blinking LED is just a simple project to get you started with the ESP32.
You may also like:
- Dynamic WLAN configuration for ESP32 Board | AutoConnect
- ESP32 BLE on Arduino IDE with UART Test
- ESP32 Bluetooth Low Energy (BLE) on Arduino IDE
- ArduinoOTA ESP32: Wi-Fi (OTA) Wireless Update from the Arduino IDE
- ESP32 with LoRa using Arduino IDE
- How To Use Grove-LCD RGB Backlight with NodeMCU
- NodeMcu to DHT Interface in Blynk app
- How To ON/OFF a bulb by Google voice assistant
- Arduino IDE | Arduino | Open Source Hardware/Softawre | Arduino Vs RPi
- WiFi LoRA 32 (V2) ESP32 | Overview | Introduction
- DHT11 sensor with ESP8266/NodeMCU using Arduino IDE
- Arduino Support for ESP8266 with simple test code