

Getting started with ROCK Pi E
ROCK Pi E is a Rockchip RK3328 based SBC(Single Board Computer) by Radxa. Here E for Ethernets. It equips a 64bits quad core processor, USB 3.0, dual ethernets, wireless connectivity at the size of 2.5×2.2 inch(56x65mm), making it perfect for IoT and network applications. ROCK Pi E comes in various ram sizes from 512MB to 4GB DDR3, and uses uSD card for OS and storage as well as supporting eMMC module. Optionally, ROCK Pi E supports PoE, additional HAT is required.
This guide is designed for ROCK Pi E enthusiast. The purpose is to learn about the ROCK Pi E board as well as how to prepare and set up for basic use.
Getting started with ROCK Pi E
What you need
Necessary
- ROCK Pi E main board
- One of the Storage media below:
- μSD card, larger than 8GB.
- eMMC Module, larger than 8GB with eMMC to μSD converter board.
- Power supply
- The ROCK Pi E is powered by Type-C DC 5V.
- USB to TTL serial cable
- ROCK Pi E exports a dedicated serial console, which can access the low level debug message.
Optional
- μSD Card Reader
- For flashing the image into μSD Card or eMMC Module.
- Ethernet cable
- ROCK Pi E supports Internet access via WiFi or Ethernet.
- One or two Ethernet cable are used to connect your ROCK Pi E to a local network and the Internet.
- Audio cable
- Audio can be played through speaker or headphones using a standard 3.5mm jack.
Starting the board for the first time
ROCK Pi E can be started with eMMC or μSD Card. Now, you are presented with two options when installing your new operating system onto your ROCK Pi E.
Prepare
- When start system with eMMC
Insert eMMC Module into eMMC to μSD card converter board. Insert the converter board into μSD Card Reader, which connects to host computer.
- When start system with μSD Card
Insert the μSD Card into μSD Card Reader, which connects to host computer.
Write Image
- Download the flash tool, etcher, from Downloads. Choose the right version for your host operation system. Here we operate on host Ubuntu 16.04.
- After unpacking the package, we run the tool by executing the command
$ ./etcher-etcher-electron-1.4.5-x86_64.AppImage
If you get an error message: “No polkit authentication agent found” you can try and start it with sudo, but do know that this is running the tool as root.
- In the etcher window, click Select image.
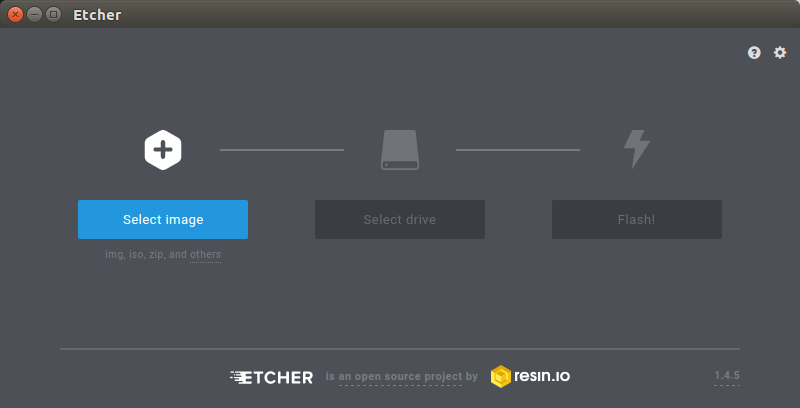
- In the etcher window, click Select Drive.
- In the etcher window, click Flash.
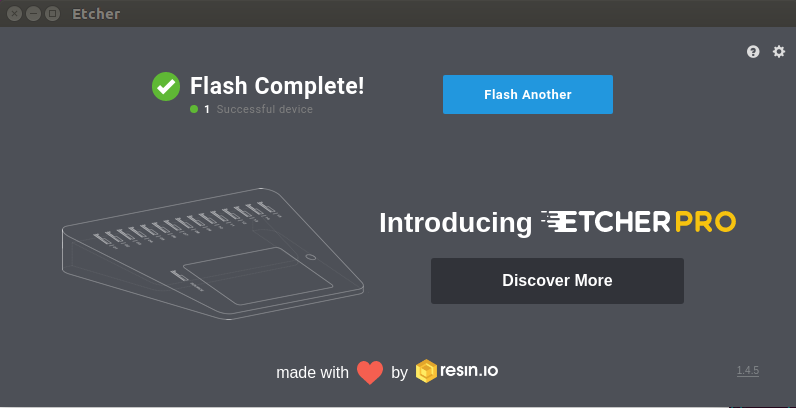
- In the etcher window, once it shows us Flash Complete! It is done and can be put into the RockPi.
Boot
- Now insert system storage media, eMMC Module or uSD card into the socket on board.
- Use the USB to TTL serial cable to setup a connection between PC and ROCK Pi E board. See Serial Console.
- Connect the power supply to the ROCK Pi E. The board will begin to immediately. (You might not see the boot sequence, on Ubuntu Server you will see the login prompt)
General purpose input-output (GPIO) connector
ROCK Pi E has one 40-pin expansion header. Hardware V10
| GPIO number | Func4 | Func3 | Func2 | Func1 | Pin# | Pin# | Func1 | Func2 | Func3 | Func4 | GPIO number | |
|---|---|---|---|---|---|---|---|---|---|---|---|---|
| +3.3V | 1 | 2 | +5.0V | |||||||||
| 68 | I2C1_SDA | GPIO2_A4 | 3 | 4 | +5.0V | |||||||
| 69 | I2C1_SCL | GPIO2_A5 | 5 | 6 | GND | |||||||
| 100 | UART1_TX | SDMMC0EXT_D0 | TSP_D0 | GPIO3_A4 | 7 | 8 | GPIO2_A0 | UART2_TX_M1 | 64 | |||
| GND | 9 | 10 | GPIO2_A1 | UART2_RX_M1 | 65 | |||||||
| 96 | SPI_CLK_M2 | SDMMC0EXT_CMD | TSP_VALID | GPIO3_A0 | 11 | 12 | GPIO2_D2 | 90 | ||||
| 104 | SPI_CSN0_M2 | TSP_D4 | GPIO3_B0 | 13 | 14 | GND | ||||||
| 98 | SPI_RXD_M2 | SDMMC0EXT_CLK | TSP_CLK | GPIO3_A2 | 15 | 16 | USB20DM | |||||
| +3.3V | 17 | 18 | USB20DP | |||||||||
| 27 | SPDIF_TX_M0 | GPIO0_D3 | 19 | 20 | GND | |||||||
| 83 | CARD_CLK_M1 | PDM_SDI0_M0 | I2S1_SDI | GPIO2_C3 | 21 | 22 | GPIO2_B4 | SPI_CSN1_M0 | 76 | |||
| 60 | CLK32KOUT_M1 | GPIO1_D4 | 23 | 24 | GPIO2_A3 | EFUSE_PWREN | 67 | |||||
| GND | 25 | 26 | GPIO2_C7 | I2S1_SDO | PDM_FSYNC_M0 | 87 | ||||||
| 97 | SPI_TXD_M2 | SDMMC0EXT_DET | TSP_FAIL | GPIO3_A1 | 27 | 28 | GPIO2_C1 | I2S1_LRCK_TX | SPDIF_TX_M1 | TSP_D6_M1 | 81 | |
| 80 | TSP_D5_M1 | I2S1_LRCK_RX | GPIO2_C0 | 29 | 30 | GND | ||||||
| 79 | TSP_SYNC_M1 | I2S1_MCLK | GPIO2_B7 | 31 | 32 | GPIO3_A6 | TSP_D2 | SDMMC0EXT_D2 | UART1_RX | 102 | ||
| 82 | TSP_D7_M1 | PDM_CLK_M0 | I2S1_SCLK | GPIO2_C2 | 33 | 34 | GND | |||||
| ADC_IN1 | 35 | 36 | GPIO2_C5 | I2S1_SDIO2 | PDM_SDI2_M0 | CARD_DET_M1 | 85 | |||||
| 66 | IR_RX | GPIO2_A2 | 39 | 38 | GPIO2_C4 | 2S1_SDIO1 | PDM_SDI1_M0 | CARD_RST_M1 | 84 | |||
| GND | 39 | 40 | GPIO2_C6 | I2S1_SDIO3 | PDM_SDI3_M0 | CARD_IO_M1 | 86 |
Features
| Model | ROCK Pi E | |
|---|---|---|
| Processor | SoC RK3328 Quad Cortex-A53 ARM 64bits processor frequency up to 1.3GHz |
|
| Memory | 256MB / 512MB / 1GB / 2GB DDR3 | |
| Storage | MicroSD(TF) up to 128GB High performance eMMC module 16GB / 32GB / 64GB / 128GB |
|
| Wireless | 802.11 b/g/n wifi Bluetooth 4.0(rtl8723bu) external antenna |
|
| USB | USB3.0 Type-A HOST x1 | |
| Key | Reset x1 | |
| Ethernet | 1x 1000Mbit ethernet, optional PoE(additional HAT required) 1x 100Mbit ethernet |
|
| IO | 40-pin expansion header USB 2.0 x1 I2C x1 SPI x1 UART x2 I2S x1 5V DC power in x2 3.3V DC power in x2 |
|
| Others | RTC connector, LEDs | |
| Power | USB Type-C DC 5V | |
| Size | 2.5×2.2 inch(56x65mm) | |
I hope you like this post “Getting started with ROCK Pi E”. Do you have any questions? Leave a comment down below!
Thanks for reading. If you like this post probably you might like my next ones, so please support me by subscribing my blog.
You may like also :
Pingback: Rock Pi Boards | Rock Pi 4 | Rock Pi X | Rock Pi N10 - CompileIoT
Do you know the temperature specs for the rock pi e board?
No, I don’t know.
I am waiting for Rock Pi E. Once i got the Rock Pi E, I will published a detailed Review of Rock Pi E. I already ordered to Engineering sample of Rock Pi E.
Pingback: Rock Pi Boards | Rock Pi 4 | Rock Pi X | Rock Pi N10 — APalgorithm