
Log Temperature Sensor Data to Google Sheet using NodeMCU ESP8266
Today we will do a similar project and use the Google sheet as IoT cloud to log the data generated by a Temperature Sensor. Here we will use ESP8266 NodeMCU to send the temperature and humidity data from DHT11 sensor to the Google Sheet over the internet.
In previous projects we learned to log the data on SD card and other IoT clouds like ThingSpeak, MQTT server, Adafruit IO, Firebase etc.
- Raspberry Pi and DHT11 with Cayenne
- NodeMCU ESP8266 with DHT11 and Firebase Real-Time Database
- DHT11 sensor with ESP8266/NodeMCU using Arduino IDE
- DHT11 vs DHT22: Overview
- ESP32 BLE with DHT11
- NodeMcu to DHT Interface in Blynk app
Components Required
- NodeMCU ESP8266 Module
- DHT11 Sensor
- Jumpers
Circuit Diagram
Connect DHT11 sensor with D4 pin of NodeMCU.
There will be a few steps before starting to program ESP8266 for Logging Temperature Data on Google Sheet. We will be needing few credentials that will be used to communicate and send the data from ESP8266 to Google Server to reflect on Google Sheet. The ESP8266 NodeMCU code is attached at the end of this tutorial.
Log Temperature Sensor Data to Google Sheet using NodeMCU ESP8266
Creating Google Script in Google Sheet for Data Logging
1. Login to the Gmail with your Email ID and Password.
- Go to the App Icon In Top Right Corner Highlighted in Green Circle and Click on Docs.
-
The Google Docs screen will appear. Now choose Sheets in the right sidebar.
-
Create a New Blank Sheet.
-
The Blank Sheet will be created with an “Untitled Spreadsheet”. Just rename this created Spreadsheet Project to any name you want. In my case I have renamed “Untitled Spreadsheet” to “ESP8266_Temp_Logger” since I am logging temperature using ESP8266. To rename the created Spreadsheet Project, go to “File” > “Rename”.
-
You can also add another multiple sheets in Google spread sheet. In this tutorial only one sheet is used. So I have renamed “Sheet1” > “TempSheet” since I am logging Temperature data to sheet.
7. After renaming the created Spreadsheet Project and Sheet name, now its time to create a Google script.
8. Now got to ‘Tools’ marked in green circle and click on “<> Script Editor” option marked on red circle.
- The new Google Script is created with “Untitled project”. You can rename this Google Script File to any name you want. In my Case I have renamed to “Untitled project” > “TempLog_Script”.
-
Now Copy and Paste the Google Script code from file attached in this ZIP file here (GoogleScript.gs)(https://electronicsguy.wordpress.com/). Then edit the Sheet name and Sheet ID in the code. You can get the Sheet ID from the Sheet URL.
https://docs.google.com/spreadsheets/d/XXXXXXXXXXXXXXXXX/edit#gid=0 , where “xxxxxxxxxxx” is your Sheet ID.
12. Save the file. If you want to make your own sheet then change your credentials such as Sheet ID, Sheet Name and Sheet Project Name.
13. Now we have finished the Setting up Google Script in Spreadsheet. Now it’s time to get the major credential i.e. Google Script ID which will be written in the Arduino Program. If you make mistake in the copying Google Script ID then the data won’t reach to Google Sheet.
Getting the Google Script ID
- Go to ‘Publish’ > ‘Deploy as Web App…’
-
The “Project version” will be “New”. Select “your email id” in the “Execute the app as” field. Choose “Anyone, even anonymous” in the “Who has access to the app” field. And then Click on “Deploy”. Note that When republishing please select the latest version and then Deploy again.
3. You will have to give the Google permission to deploy it as web app. Just click on “Review Permissions”.
- Then choose your Email ID here using which you have created spreadsheet.
-
If displayed “thios app is not verified”. Click on “Advanced”
6. And then click on “Go to ‘your_script_name’(unsafe)”. Here in my case it is “TempLog_Script”.
7. Click on “Allow” and this will give the permission to deploy it as web app.
- Now you can see the new screen with a given link and named as “Current web app URL”. This URL contains Google Script ID. Just copy the URL and save it somewhere.
9. Now when you copy the code, the format is like <https://script.google.com/macros/s/____Your_Google _ScriptID___/exec>.
Just save this Google Script to some place.
Programming NodeMCU to Send Temperature Data to Google Sheets
Here the DHT sensor is connected to ESP8266 NodeMCU and ESP8266 NodeMCU is connected to Internet through WiFi to send the DHT11 readings to Google Sheet. So start with including the necessary libraries. As usual the complete code is given at the end of this tutorial.
The library ESP8266WiFi.h is used for accessing the functions of ESP8266, the HTTPSRedirect.h library is used for connecting to Google Spreadsheet Server, DebugMacros.h is used to debug the data receiving and DHT.h is a used to the read the DHT11 sensor.
#include <ESP8266WiFi.h>
#include "HTTPSRedirect.h"
#include "DebugMacros.h"
#include <DHT.h>
Initially define the NodeMCU Pin Number where DHT11 sensor will be read. Here the output of DHT11 is connected to D4 of NodeMCU. Also define thee DHT type, here we are using DHT11 sensor.
#define DHTPIN D4
#define DHTTYPE DHT11
Define variables to store the temperature and humidity value.
float h;
float t;
String sheetHumid = "";
String sheetTemp = "";
Enter your WiFi credentials such as SSID name and Password.
const char* ssid = "iotbyhvm";
const char* password = "iotbyhvmfun";
Enter the Google server credentials such as host address, Google script ID and port number. The host and port number will be same as attached code but you need to change the Google Scripts ID that we got from the above steps.
const char* host = "script.google.com";
const char* GScriptId = "AKfycbxXXXXXXXXXXXXXXXXXt";  //Repalace with your script id
const int httpsPort = 443;
Define the URL of Google Sheet where the data will be written. This is basically a path where the data will be written.
String url = String("/macros/s/") + GScriptId + "/exec?value=Temperature";
String url2 = String("/macros/s/") + GScriptId + "/exec?cal";
Define the Google sheet address where we created the Google sheet.
String payload_base =  "{\"command\": \"appendRow\", \
                    \"sheet_name\": \"TempSheet\", \
                       \"values\": ";
Define the client to use it in the program ahead.
HTTPSRedirect* client = nullptr;
Start the serial debugger or monitor at 115200 baud rate. You can also select other baud rates such as 9600, 57600 etc. And then initialise DHT11 sensor.
  Serial.begin(115200);
  dht.begin();
Connect to WiFi and wait for the connection to establish.
WiFi.begin(ssid, password);
  while (WiFi.status() != WL_CONNECTED) {
    delay(500);
    Serial.print(".");
  }
Start a new HTTPS connection. Note that if you are using HTTPS the you need to write the line setInscure() otherwise the connection will not establish with server.
  client = new HTTPSRedirect(httpsPort);
  client->setInsecure();
  Start the respose body i.e. if the server replies then we can print it on serial monitor.
  client->setPrintResponseBody(true);
  client->setContentTypeHeader("application/json");
Connect to host. Here it is “script.google.com“.
  Serial.print("Connecting to ");
  Serial.println(host);
Try connection for five times and if doesn’t connect after trying five times then drop the connection.
  bool flag = false;
  for (int i = 0; i < 5; i++) {
    int retval = client->connect(host, httpsPort);
    if (retval == 1) {
      flag = true;
      break;
    }
    else
      Serial.println("Connection failed. Retrying...");
  }
We will communicate with server with GET and POST function. GET will be used to read the cells and POST will be used to write into the cells. Get the cell data of A1 from Google sheet.
client->GET(url, host);
Read the temperature and Humidity data from DHT11 sensor and save it in variable. If any reads fails then print a fail message and return.
h = dht.readHumidity();
  t = dht.readTemperature
  if (isnan(h) || isnan(t)) {
    Serial.println(F("Failed to read from DHT sensor!"));
    return;
  }
Write the data in the path. This data will be written in the Google Sheet. The data path contains Temperature and Humidity data such as sheetTemp and sheetHumid.
payload = payload_base + "\"" + sheetTemp + "," + sheetHumid + "\"}";
If client is connected then simply send the Data to Google Sheet by using POST function. Or save it if the data fails to send and count the failure.
   if (client->POST(url2, host, payload)) {
    ;
  }
  else {
    ++error_count;
    DPRINT("Error-count while connecting: ");
    DPRINTLN(error_count);
  }
If data sending fails for three times then halt all processes and exit and go to deepsleep.
  if (error_count > 3) {
    Serial.println("Halting processor...");
    delete client;
    client = nullptr;
    Serial.printf("Final free heap: %u\n", ESP.getFreeHeap());
    Serial.printf("Final stack: %u\n", ESP.getFreeContStack());
    Serial.flush();
    ESP.deepSleep(0);
  }
Give a delay of at least 2 seconds after every reading and sending as it is recommended by the DHT library and HTTPSRedirect library.
#include <ESP8266WiFi.h>
#include "HTTPSRedirect.h"
#include "DebugMacros.h"
#include <DHT.h>

#define DHTPIN D4              // what digital pin we're connected to
#define DHTTYPE DHT11         // select dht type as DHT 11 or DHT22
DHT dht(DHTPIN, DHTTYPE);

float h;
float t;
String sheetHumid = "";
String sheetTemp = "";

const char* ssid = "iotbyhvm";                //replace with our wifi ssid
const char* password = "iotbyhvmfun";         //replace with your wifi password

const char* host = "script.google.com";
const char *GScriptId = "AKfycbxyXXXXXXXXXXXXoEtlkuNt"; // Replace with your own google script id
const int httpsPort = 443; //the https port is same

// echo | openssl s_client -connect script.google.com:443 |& openssl x509 -fingerprint -noout
const char* fingerprint = "";

//const uint8_t fingerprint[20] = {};

String url = String("/macros/s/") + GScriptId + "/exec?value=Temperature";  // Write Teperature to Google Spreadsheet at cell A1
// Fetch Google Calendar events for 1 week ahead
String url2 = String("/macros/s/") + GScriptId + "/exec?cal";  // Write to Cell A continuosly

//replace with sheet name not with spreadsheet file name taken from google
String payload_base =  "{\"command\": \"appendRow\", \
                    \"sheet_name\": \"TempSheet\", \
                       \"values\": ";
String payload = "";

HTTPSRedirect* client = nullptr;

// used to store the values of free stack and heap before the HTTPSRedirect object is instantiated
// so that they can be written to Google sheets upon instantiation

void setup() {
  delay(1000);
  Serial.begin(115200);
  dht.begin();     //initialise DHT11

  Serial.println();
  Serial.print("Connecting to wifi: ");
  Serial.println(ssid);

  WiFi.begin(ssid, password);
  while (WiFi.status() != WL_CONNECTED) {
    delay(500);
    Serial.print(".");
  }
  Serial.println("");
  Serial.println("WiFi connected");
  Serial.println("IP address: ");
  Serial.println(WiFi.localIP());

  // Use HTTPSRedirect class to create a new TLS connection
  client = new HTTPSRedirect(httpsPort);
  client->setInsecure();
  client->setPrintResponseBody(true);
  client->setContentTypeHeader("application/json");
  Serial.print("Connecting to ");
  Serial.println(host);          //try to connect with "script.google.com"

  // Try to connect for a maximum of 5 times then exit
  bool flag = false;
  for (int i = 0; i < 5; i++) {
    int retval = client->connect(host, httpsPort);
    if (retval == 1) {
      flag = true;
      break;
    }
    else
      Serial.println("Connection failed. Retrying...");
  }

  if (!flag) {
    Serial.print("Could not connect to server: ");
    Serial.println(host);
    Serial.println("Exiting...");
    return;
  }
// Finish setup() function in 1s since it will fire watchdog timer and will reset the chip.
//So avoid too many requests in setup()

  Serial.println("\nWrite into cell 'A1'");
  Serial.println("------>");
  // fetch spreadsheet data
  client->GET(url, host);

  Serial.println("\nGET: Fetch Google Calendar Data:");
  Serial.println("------>");
  // fetch spreadsheet data
  client->GET(url2, host);

 Serial.println("\nStart Sending Sensor Data to Google Spreadsheet");


  // delete HTTPSRedirect object
  delete client;
  client = nullptr;
}

void loop() {

  h = dht.readHumidity();                                              // Reading temperature or humidity takes about 250 milliseconds!
  t = dht.readTemperature();                                           // Read temperature as Celsius (the default)
  if (isnan(h) || isnan(t)) {                                                // Check if any reads failed and exit early (to try again).
    Serial.println(F("Failed to read from DHT sensor!"));
    return;
  }
  Serial.print("Humidity: ");  Serial.print(h);
  sheetHumid = String(h) + String("%");                                         //convert integer humidity to string humidity
  Serial.print("%  Temperature: ");  Serial.print(t);  Serial.println("°C ");
  sheetTemp = String(t) + String("°C");

  static int error_count = 0;
  static int connect_count = 0;
  const unsigned int MAX_CONNECT = 20;
  static bool flag = false;

  payload = payload_base + "\"" + sheetTemp + "," + sheetHumid + "\"}";

  if (!flag) {
    client = new HTTPSRedirect(httpsPort);
    client->setInsecure();
    flag = true;
    client->setPrintResponseBody(true);
    client->setContentTypeHeader("application/json");
  }

  if (client != nullptr) {
    if (!client->connected()) {
      client->connect(host, httpsPort);
      client->POST(url2, host, payload, false);
      Serial.print("Sent : ");  Serial.println("Temp and Humid");
    }
  }
  else {
    DPRINTLN("Error creating client object!");
    error_count = 5;
  }

  if (connect_count > MAX_CONNECT) {
    connect_count = 0;
    flag = false;
    delete client;
    return;
  }

//  Serial.println("GET Data from cell 'A1':");
//  if (client->GET(url3, host)) {
//    ++connect_count;
//  }
//  else {
//    ++error_count;
//    DPRINT("Error-count while connecting: ");
//    DPRINTLN(error_count);
//  }

  Serial.println("POST or SEND Sensor data to Google Spreadsheet:");
  if (client->POST(url2, host, payload)) {
    ;
  }
  else {
    ++error_count;
    DPRINT("Error-count while connecting: ");
    DPRINTLN(error_count);
  }

  if (error_count > 3) {
    Serial.println("Halting processor...");
    delete client;
    client = nullptr;
    Serial.printf("Final free heap: %u\n", ESP.getFreeHeap());
    Serial.printf("Final stack: %u\n", ESP.getFreeContStack());
    Serial.flush();
    ESP.deepSleep(0);
  }

  delay(3000);    // keep delay of minimum 2 seconds as dht allow reading after 2 seconds interval and also for google sheet
}
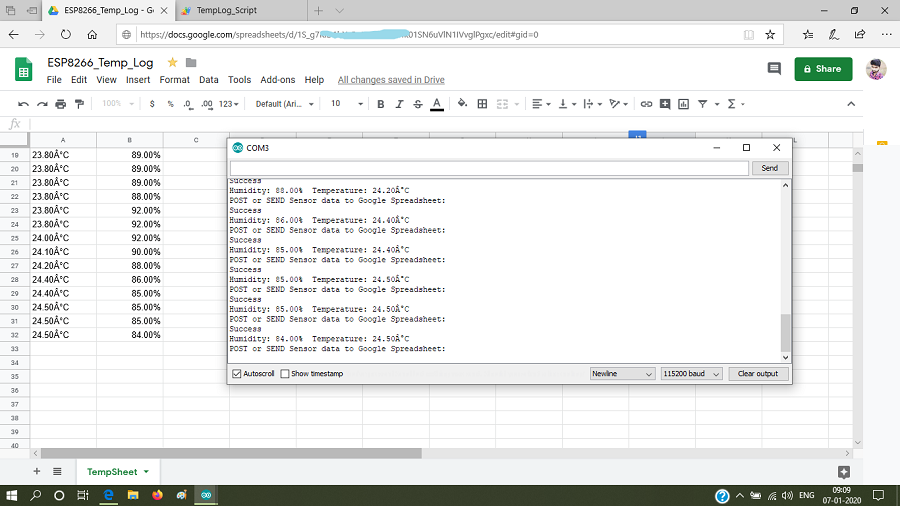
Output
I hope you like this post “Log Temperature Sensor Data to Google Sheet using NodeMCU ESP8266”. Do you have any questions? Leave a comment down below!
Thanks for reading. If you like this post probably you might like my next ones, so please support me by subscribing my blog.
Recommended : ESP8266 Tutorials | NodeMCU Programming | Arduino IDE
We used google script in this tutorial written by Sujay Phadke. Visit Github Page https://github.com/electronicsguy/


Pingback: Log Temperature Sensor Data to Google Sheet using NodeMCU ESP8266 — IoTbyHVM – Bits & Bytes of IoT – hashstacks
Your approach seems very good, and your explanation quite clear.
HOWEVER, I have not been able to get it to work!
My experience with Arduino is limited, but I have been able to do a few other projects with no trouble.
I will use my own program to generate data, so I have commented out all the DHT stuff, and substituted two numbers for the t and h variables.
In trying to compile, various errors are flagged.
I commented out all of these, and the program runs to the point of connecting with my server and saying that it is putting data to the sheet..
I also could not find the file “DebugMacros.h” – and commented it out as well.
Now, looking at the problem lines, the error responses are:
HTTPSRedirect has no member GET
HTTPSRedirect has no member POST
HTTPSRedirect has no member setPrintResponseBody
+ various others related to HTTPSRedirect
I’m using IDE 1.8.10, and the version called HTTPSRedirect1 with an internal date of 11/16/2016
Any help will be appreciated. I have spent considerable time on this so far.
TIA –
Matt
Yes , you right
Nowadays many users are facing same problem.
Actually i used google script in this tutorial written by Sujay Phadke. Visit Github Page https://github.com/electronicsguy/
I already mentioned in the article.
Recently Google updates some policies.
So users faced “Https Redirect” error.
I am working on it. I will update this post in this week.
Thanks for comment and sharing your errors here.
Stay connected , I will update this post.
If you have any suggestion or recommendation. Please share here.
Hi, Matt
i check and verify code and script. Now everything is fine and working. Please send me screenshots and tell me your errors in details.
I am using amica nodemcu and arduino 1.8.10. if possible, reinstall Arduino IDE and add libraries manually. Always publish new(latest code) google scricpt.
Please Reinstall and Resetup Arduino IDE If you are using Arduino IDE with Windows 10. i think you are facing libraries issues.
I’m about to leave now for the day.
Later i’ll try re-installing 1.8.10 and adding the libraries manually. I am doing this with Windows 10 on my laptop.
To be certain, can you tell me exactly where to find the libraries needed in addition to those that come with the IDE and the board (NodeMCU8266). I couldn’t find the debug library.
My board is the Version 0.9, but that should not be important.
Visit this drive link https://drive.google.com/open?id=1SMMvokaFcj6dVAWdIqeSy1mJjmOampUp
Here you can find all libraries. You don’t need debug library. You need only Httpsredirect and dht library. Both file available in above link.
Try with change the project name.
Today i verify with nodemcu 1.0 and windows 10. It is working with no errors.
You are facing libraries issues only.
Thanks for your help so far, but I still can’t get the program to compile.
I think you are right, that my program has to do with the libraries.
I don’t intend to use the DHT, so for now I have commented out that stuff, and used two numbers for t and h.
Here’s what I’ve done so far:
Deleted and re-started Arduino 1.8.10
Added the HTTPSRedirect library (using “add Zip Library) from your file contained within the link you sent me: Google_Script_and_Libraries_for_Data_logging.
The file named GoogleScript seems to be only part of an Arduino program, so I did not use it. Instead, I reverted to my original program, taken from your example above.
Again, the program will not compile, and rejects statements such as GET, POST and others related (I think) to the library HTTPSRedirect.
I commented out all the lines that produced errors. I then compiled and ran the Arduino portion, and found in the Serial Monitor the following:
Connecting to wifi: A47FB0
.
WiFi connected
IP address:
192.168.1.8
Connecting to script.google.com
Write into cell ‘A1’
——>
GET: Fetch Google Calendar Data:
——>
Start Sending Sensor Data to Google Spreadsheet
Humidity: 77.00% Temperature: 88.00°C
Sent : Temp and Humid
Humidity: 77.00% Temperature: 88.00°C
Humidity: 77.00% Temperature: 88.00°C
Humidity: 77.00% Temperature: 88.00°C
I have copied below the whole program that I am using in the NodeMCU/Arduino portion.
The lines I have commented out mostly have an “mcb” (my initials) just after the comment //.
Un-commenting any of these lines will show you the errors I’m finding.
It looks like the library is either not correct, incomplete, or something.
Incidentally, your pointing me to the GoogleDevelopers site should help when I get to that point.
Any further ideas?
Here is the code I’m using, that compiles after commenting out the error-producing lines:
// New code from the site:
// https://iotbyhvm.ooo/log-temperature-sensor-data-to-google-sheet-using-nodemcu-esp8266/
//==============================================
#include <ESP8266WiFi.h>
#include “HTTPSRedirect.h”
#include <dummy.h>
#include <ESP8266HTTPClient.h>
// mcb HTTPSRedirect(void);
// mcb HTTPSRedirect(const int& 443);
// #include “DebugMacros.h”
// #include <DHT.h>
// #define DHTPIN D4 // what digital pin we’re connected to
// #define DHTTYPE DHT11 // select dht type as DHT 11 or DHT22
// DHT dht(DHTPIN, DHTTYPE);
float h;
float t;
String sheetHumid = “”;
String sheetTemp = “”;
const char* ssid = “A47FB0”; //replace with our wifi ssid
const char* password = “96880104”; //replace with your wifi password
const char* host = “script.google.com”;
// const char *GScriptId = “AKfycbxyXXXXXXXXXXXXoEtlkuNt”; // Replace with your own google script id
const char *GScriptId = “AKfycbw715K2g_RNpL3b2R53Ujpe3juupkSSK5jj6fs8HA5MC-iCo24”; // Replace with your own google script id
// AKfycbw715K2g_RNpL3b2R53Ujpe3juupkSSK5jj6fs8HA5MC-iCo24
const int httpsPort = 443; //the https port is same
// echo | openssl s_client -connect script.google.com:443 |& openssl x509 -fingerprint -noout
const char* fingerprint = “”;
//const uint8_t fingerprint[20] = {};
String url = String(“/macros/s/”) + GScriptId + “/exec?value=Temperature”; // Write Teperature to Google Spreadsheet at cell A1
// Fetch Google Calendar events for 1 week ahead
String url2 = String(“/macros/s/”) + GScriptId + “/exec?cal”; // Write to Cell A continuosly
//replace with sheet name not with spreadsheet file name taken from google
String payload_base = “{\”command\”: \”appendRow\”, \
\”sheet_name\”: \”TempSheet\”, \
\”values\”: “;
String payload = “”;
HTTPSRedirect* client = nullptr;
// used to store the values of free stack and heap before the HTTPSRedirect object is instantiated
// so that they can be written to Google sheets upon instantiation
void setup() {
delay(1000);
Serial.begin(115200);
// dht.begin(); //initialise DHT11
Serial.println();
Serial.print(“Connecting to wifi: “);
Serial.println(ssid);
WiFi.begin(ssid, password);
while (WiFi.status() != WL_CONNECTED) {
delay(500);
Serial.print(“.”);
}
Serial.println(“”);
Serial.println(“WiFi connected”);
Serial.println(“IP address: “);
Serial.println(WiFi.localIP());
// Use HTTPSRedirect class to create a new TLS connection
client = new HTTPSRedirect(httpsPort);
client->setInsecure();
// mcb client->setPrintResponseBody(true);
// mcb client->setContentTypeHeader(“application/json”);
Serial.print(“Connecting to “);
Serial.println(host); //try to connect with “script.google.com”
// Try to connect for a maximum of 5 times then exit
bool flag = false;
for (int i = 0; i < 5; i++) {
int retval = client->connect(host, httpsPort);
if (retval == 1) {
flag = true;
break;
}
else
Serial.println(“Connection failed. Retrying…”);
}
if (!flag) {
Serial.print(“Could not connect to server: “);
Serial.println(host);
Serial.println(“Exiting…”);
return;
}
// Finish setup() function in 1s since it will fire watchdog timer and will reset the chip.
//So avoid too many requests in setup()
Serial.println(“\nWrite into cell ‘A1′”);
Serial.println(“——>”);
// fetch spreadsheet data
// mcb 5 Jan 20 client->GET(url, host);
// ditto GET(url, host);
Serial.println(“\nGET: Fetch Google Calendar Data:”);
Serial.println(“——>”);
// fetch spreadsheet data
// mcb client->GET(url2, host);
Serial.println(“\nStart Sending Sensor Data to Google Spreadsheet”);
// delete HTTPSRedirect object
delete client;
client = nullptr;
}
void loop() {
// h = dht.readHumidity(); // Reading temperature or humidity takes about 250 milliseconds!
h = 77;
t = 88;
// t = dht.readTemperature(); // Read temperature as Celsius (the default)
if (isnan(h) || isnan(t)) { // Check if any reads failed and exit early (to try again).
Serial.println(F(“Failed to read from DHT sensor!”));
return;
}
Serial.print(“Humidity: “); Serial.print(h);
sheetHumid = String(h) + String(“%”); //convert integer humidity to string humidity
Serial.print(“% Temperature: “); Serial.print(t); Serial.println(“°C “);
sheetTemp = String(t) + String(“°C”);
static int error_count = 0;
static int connect_count = 0;
const unsigned int MAX_CONNECT = 20;
static bool flag = false;
payload = payload_base + “\”” + sheetTemp + “,” + sheetHumid + “\”}”;
if (!flag) {
client = new HTTPSRedirect(httpsPort);
client->setInsecure();
flag = true;
// mcb client->setPrintResponseBody(true);
// mcb client->setContentTypeHeader(“application/json”);
}
if (client != nullptr) {
if (!client->connected()) {
client->connect(host, httpsPort);
// client->POST(url2, host, payload, false);
Serial.print(“Sent : “); Serial.println(“Temp and Humid”);
}
}
else {
// mcb DPRINTLN(“Error creating client object!”);
error_count = 5;
}
if (connect_count > MAX_CONNECT) {
connect_count = 0;
flag = false;
delete client;
return;
// }
Serial.println(“GET Data from cell ‘A1’:”);
// if (client->GET(url3, host)) {
// ++connect_count;
// }
// else {
// ++error_count;
// DPRINT(“Error-count while connecting: “);
// DPRINTLN(error_count);
// }
// mcb Serial.println(“POST or SEND Sensor data to Google Spreadsheet:”);
// mcb if (client->POST(url2, host, payload)) {
// ;
}
// }
// mcb else {
// mcb ++error_count;
// mcb DPRINT(“Error-count while connecting: “);
// mcb DPRINTLN(error_count);
// mcb }
if (error_count > 3) {
Serial.println(“Halting processor…”);
delete client;
client = nullptr;
Serial.printf(“Final free heap: %u\n”, ESP.getFreeHeap());
Serial.printf(“Final stack: %u\n”, ESP.getFreeContStack());
Serial.flush();
ESP.deepSleep(0);
}
delay(3000); // keep delay of minimum 2 seconds as dht allow reading after 2 seconds interval and also for google sheet
}
// end of the code
Hi –
I haven’t bothered you recently, as I finally found my errors and now have my system mostly working.
HOWEVER, the data I produce and send to the sheet will also have to include a current time and date.
So far I have not figured out how to get these into my Arduino program. (I HAVE been able to write these into the first row – by using the items in the “OnOpen” command in the Google app.)
Help here will be appreciated!
– Matt Baum
Try this if you face connectivity issues: http://beteshis.com/15Yy