
Mongoose OS – an IoT firmware development framework
What is Mongoose OS?
Mongoose OS is an Internet of Things Firmware Development Framework available under Apache License Version 2.0. It supports low power, connected microcontrollers such as: ESP32, ESP8266, TI CC3200, STM32. Its purpose is to be a complete environment for prototyping, development and managing connected devices.
Features of Mongoose
MCU support – STMicro: STM32 F4, L4, F7 | TI: CC3200, CC3220 | Espressif: ESP32, ESP8266
Advanced features – Reliable Over-The-Air update | Secure device provisioning | Remote management
Cloud integrations – AWS IoT, Google IoT | Microsoft Azure, IBM Watson | Private MQTT / REST backends
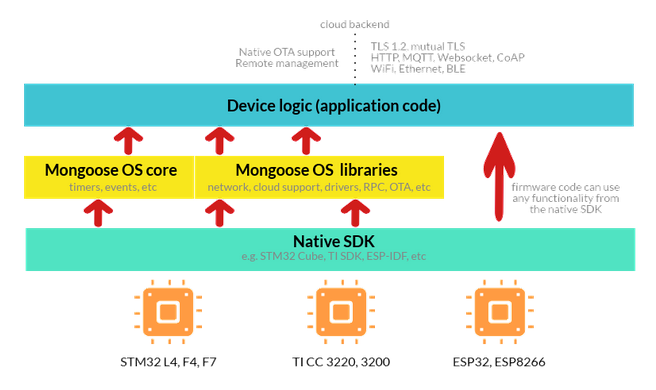
How It Work
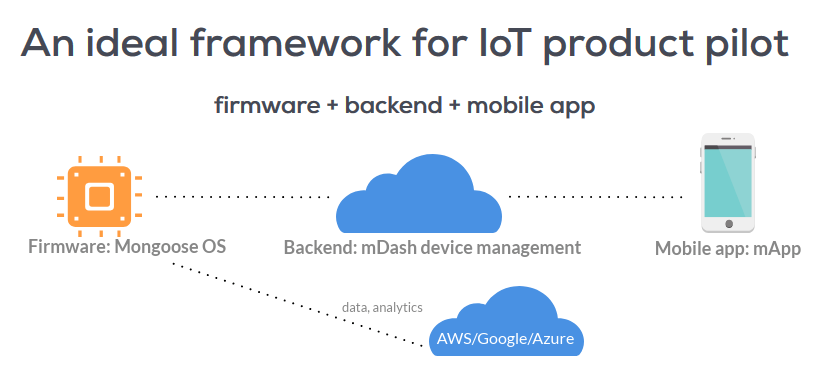
mDash and Mobile app
Here You can use two more tools mDash and Mobile app. mDash is an IoT device management. mdash provides many features such as Update Reliable, fail-safe OTA firmware updates, Web UI Online/offline device status and metadata (firmware version, build time, etc), Device twin Device twin / shadow support, compatible with AWS IoT and Azure IoT. Mobile app is Available instantly for iOS, Android, Web. You got notification and control Devices.
How to Use Mongoose OS with ESP8266
1. Download and install mos tool
Mongoose OS uses mos tool for various tasks: building firmware, flashing firmware, managing device, provisioning device on cloud services, and so on.
| OS | Setup instructions |
|---|---|
| Windows | Create C:\mos folder. Right-click on this mos.exe link, choose “Save link as”, save mos.exe into the C:\mos folder. Double-click on mos.exe to start a Web UI. If it does not start, open command prompt, enter cd c:\mos and then mos --start-webview=false |
| MacOS | First, install brew utility. Then execute the following to start a Web UI:
brew tap cesanta/mos brew install mos mos |
| Ubuntu Linux | Note: Linux version starts UI in a browser window.
sudo add-apt-repository ppa:mongoose-os/mos sudo apt-get update sudo apt-get install mos mos |
| Arch Linux | Note: Linux version start UI in a browser window.
git clone https://github.com/cesanta/mos-tool cd mos-tool/mos/archlinux_pkgbuild/mos-release makepkg pacman -U ./mos-*.tar.xz mos |
| Generic MacOS/Linux | Note: starts UI in a browser window.
curl -fsSL https://mongoose-os.com/downloads/mos/install.sh | /bin/bash mos |
2. Start mos tool
Make sure your device is connected via the USB to your workstation.
Completing previous section should leave you with the mos Web UI running:

3. USB-to-Serial drivers
If you have your device connected via the USB, the UI can still complain about the unavailable ports like this:

The most usual reason for this is a missing USB-to-Serial driver. Below are the links to the driver installation pages. Install the driver, and re-insert your device into the USB.
- Silabs drivers for Espressif boards
- CH43x drivers for Espressif boards
- FTDI drivers for CC3200, CC3220
In a “Choose port” dropdown, at least one port must appear.

4. Create new app
In the UI, select your board from the dropdown menu. Then, press Ctrl-n to create a new app. That will paste the mos clone command into the prompt:

Press Enter. That will clone the demo-js repository as app1. Notice how current directory has changed to app1:

5. Build app firmware
Make sure the board is selected. Type mos build and press Enter. That starts a build process that takes up to a minute to complete. When the command finishes, the built firmware will be located at build/fw.zip. As you can see, we did not make any changes to the app – we’ll do that later.

6. Flash firmware
Make sure the port is selected in the dropdown menu. Type mos flash and press enter. That will flash a built firmware to the device:

When flashing completes, the firmware starts to write logs to the serial console.
7. Configure WiFi
Type command mos wifi WIFI_NETWORK_NAME WIFI_PASSWORD. Use your own network name/password. Press enter. On the serial console, you’ll see how the device reboots after saving new configuration settings, joins the WiFi network, gets the IP configuration, and synchronises time with SNTP server:

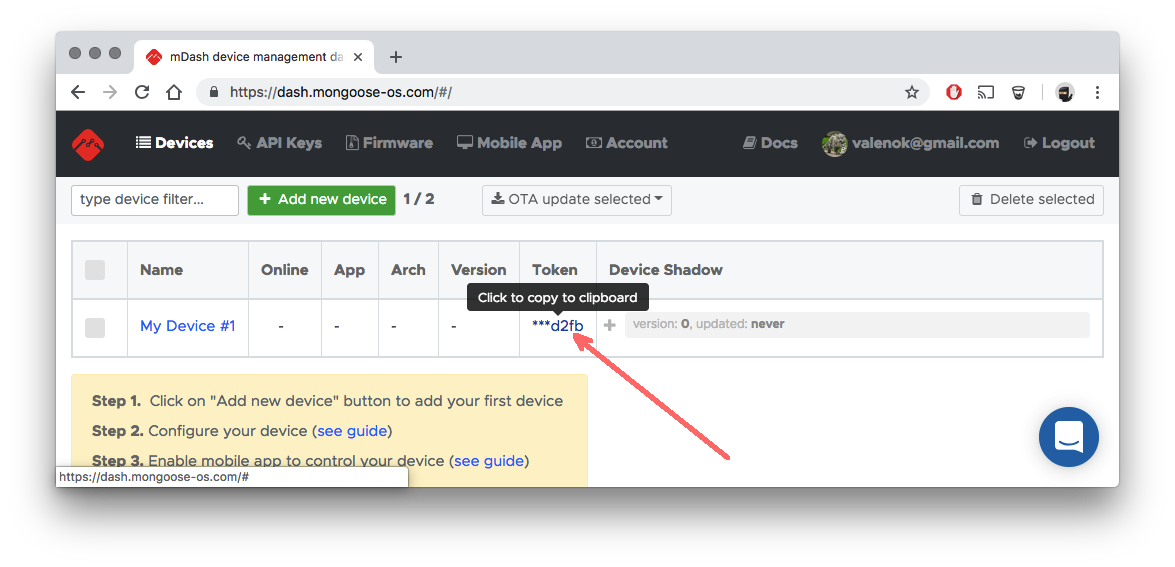
8. Add device to the mDash management dashboard
- Login to the mDash at https://dash.mongoose-os.com/.
- Click on “Add new device” button. That’ll create a new device.
- Click on a “Token” link to copy the device’s access token to the clipboard:
- Go back to the mos tool, type command (change TOKEN to your copied token) and press enter:
mos config-set dash.enable=true dash.token=TOKEN

Notice that the device started to print messages {"uptime":XX,"on":false} to the serial console. It sends this message to the dashboard.
Click on the “+” sign to expand the shadow. Scroll it down and see how the reported “uptime” metric updates every second. “Uptime” is the amount of time since the last power-on or reboot:

Click on a device name to see a detailed management console for the device: general information, real-time notifications, configuration editor, file editor, device shadow editor, and an RPC service call window.


Pingback: MQTT Products (that use MQTT) - IoTbyHVM - Explore tech bytes
Pingback: Home automation | IoT Products for Home Automation
Pingback: PlatformIO - open source ecosystem for IoT development -
Pingback: IoT Operating Systems - IoTbyHVM - Explore TechBytes
Pingback: Zerynth : Middleware for IoT - IoTbyHVM - Explore TechBytes
Pingback: MQTT Servers/Brokers - IoTbyHVM - Explore TechBytes
Pingback: Mongoose OS is now an STMicroelectronics Authorized Partner
Pingback: NodeMCU ESP8266 with DHT11 and Firebase Real-Time Database
Pingback: Best Arduino IDE alternatives to start programming
Pingback: Home automation | IoT Products for Home Automation - CompileIoT
Pingback: Top IoT Operating Systems in 2020 | IoT OS and RTOS
Pingback: OS and RTOS for IoT (Internet of Things) Devices - onionlinux.com