
Rock Pi 4 Tutorials | Getting Started with Rock Pi 4
This tutorial based on Rock Pi 4 Tutorials. This article is helpful for Getting Started with Rock Pi 4.
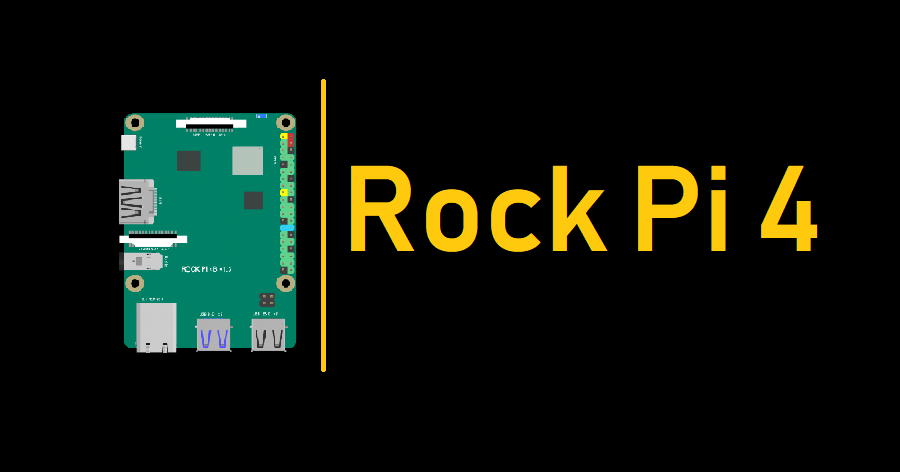
Rock Pi 4 TutorialsWhat is ROCK Pi 4 ?
ROCK Pi 4 is a Rockchip RK3399 based SBC(Single Board Computer) by Radxa. It can run android or some Linux distributions. ROCK Pi 4 features a six core ARM processor, 64bit dual channel 3200Mb/s LPDDR4, up to 4K@60 HDMI, MIPI DSI, MIPI CSI, 3.5mm jack with mic, 802.11 ac WIFI, Bluetooth 5.0, USB Port, GbE LAN, 40-pin color expansion header, RTC. Also, ROCK Pi 4 supports USB PD and QC powering.
ROCK Pi 4 comes in two models, Model A and Model B, each model has 1GB, 2GB or 4GB ram options. for detailed difference of Model A and Model B.
This is best alternative of Raspberry Pi.
Features
| Model | ROCK PI 4 Model A | ROCK PI 4 Model B |
|---|---|---|
| Processor | 64bits hexa core processor Rockchip RK3399 Dual Cortex-72, frequency 1.8GHz with qual Cortex-A53, frequency 1.4GHz Mali T860MP4 gpu, support OpenGL ES 1.1/2.0/3.0/3.1/3.2, Vulkan 1.0, Open CL 1.1 1.2, DX11. |
|
| Memory | LPDDR4 64bit dual channel LPDDR4@3200Mb/s, 1GB/2GB/4GB optioal |
|
| Storage | eMMC module (Optional industrial compatible high performance eMMC module, 8GB/16GB/32GB/64GB/128GB available) uSD card (uSD slot supports up to 128 GB uSD card) M.2 SSD (M.2 connector supports up to 2T M2 NVME SSD) |
|
| Display | HDMI 2.0 up to 4k@60 MIPI DSI 2 lanes via FPC connector HDMI and MIPI DSI can work at the same time, support mirror mode or extend mode. |
|
| Audio | 3.5mm jack with mic HD codec that supports up to 24-bit/96KHz audio. |
|
| Camera | MIPI CSI 2 lanes via FPC connector, support up to 800 MP camera. | |
| Wireless | None | 802.11 ac wifi Bluetooth 5.0 with on board antenna |
| USB | USB 3.0 OTG X1, hardware switch for host/device switch, upper one USB 3.0 HOST X1, dedicated USB 3.0 channel, lower one USB 2.0 HOST X2 |
|
| Ethernet | GbE LAN | GbE LAN with PoE support additional HAT is required for powering from PoE |
| IO | 40-pin expansion header 1 x UART 2 x SPI bus 2 x I2C bus 1 x PCM/I2S 1 x SPDIF 1 x PWM 1 x ADC 6 x GPIO 2 x 5V DC power in 2 x 3.3V DC power in |
|
| Others | RTC RTC battery connector for time backup(optioal) |
|
| Power | USB PD, support USB Type C PD 2.0, 9V/2A, 12V/2A, 15V/2A, 20V/2A. Qualcomm® Quick ChargeTM: Supports QC 3.0/2.0 adapter, 9V/2A, 12V/1.5A |
|
| Size | 85mm x 54mm | |
Rock Pi 4 Firmware Images
5 images are currently available to flash. With 2 more in the works
- Provided by Radxa
- Android TV
- Android
- Debian Desktop
- Ubuntu Server
- Third Party
- Armbian 5.67
- BRecalbox
- LibreELEC
Flashing is easy with Etcher and I had no issues on the ones I have looked at so far.
Installtion
Install on microSD
Step1: Requirements
This page describe how to download and install the image on a microSD card and boot on ROCK Pi 4. You need at least the following.
- ROCK Pi 4 board with power supply
- a microSD card, larger than 8GB, class 10 or better
- a microSD card reader, either a USB card reader or the SD card reader on laptop
- a PC/laptop running Windows or Linux or MacOS
Step 2: Download necessary tools and image
- Etcher is the tool we use to write image. Download the right Etcher for your PC from Rockpi4/downloads page and install it. Check [Etcher website] for more info about Etcher.
You may like also: Etcher – Flash OS images to SD cards & USB drives, safely and easily
- Choose the image you want to install from Rockpi4/downloads page and unzip it. The unzipped image name is like below:
rockpi4_debian_stretch_lxde_armhf_20181105_2120-gpt.img
We will use it for the writing.
Step 3: Write the image to microSD card
- Insert the uSD Card into uSD Card Reader, which connects to host computer.
-
Run the application, for example, by executing the command on Ubuntu 16.04:
$ /bin/bash etcher-etcher-electron-1.4.5-x86_64.AppImage
- In the etcher window, we click button Select image.

- In the etcher window, we click button Select Drive.

- In the etcher window, we click button Flash.

- In the etcher window, it shows us Flash Complete!

Done! Now you have successfully installed the OS image on microSD card.
Install on eMMC module
Step1: Requirements
This page describe how to download and install the image on an eMMC module and boot on ROCK Pi 4. You need at least the following.
- an eMMC module, you can buy it from radxa distributor, the eMMC module from Odroid or PINE64 also works on ROCK Pi 4.
- an eMMC to microSD breakout board


- a microSD card reader, either a USB card reader or the SD card reader on laptop
- a PC/laptop running Windows or Linux or MacOS
You also need the following to run on ROCK Pi 4
- ROCK Pi 4 board with power supply
- HDMI cable for display
- USB keyboard and mouse for input
Step 2: Download necessary tools and image
- Etcher is the tool we use to write image. Download the right Etcher for your PC from Rockpi4/downloads page and install it. Check [Etcher website] for more info about Etcher.
You may like also: Etcher – Flash OS images to SD cards & USB drives, safely and easily
- Choose the image you want to install from Rockpi4/downloads page and unzip it. The unzipped image name is like below:
rockpi4_debian_stretch_lxde_armhf_20181105_2120-gpt.img
We will use it for the writing.
Step 3: Write the image to microSD card
3.1 Plug and click the eMMC module to the eMMC to uSD breakout board, plug the breakout board to microSD card reader. Plug the card reader on PC.

3.2 Run the application, for example, by executing the command on Ubuntu 16.04:
$ /bin/bash etcher-etcher-electron-1.4.5-x86_64.AppImage
3.3 In the etcher window, we click button Select image.
3.4 In the etcher window, we click button Select Drive.
3.5 In the etcher window, we click button Flash.
3.6 In the etcher window, it shows us Flash Complete!
Done! Now you have successfully installed the OS image on eMMC module.
Step 4: Boot on ROCK Pi 4
Community
- Forum: http://forum.radxa.com
- Telegram Group: https://t.me/rockpi4
- How to contribute to this wiki
Rock Pi 4 GPIO Description
General purpose input-output (GPIO) connector
ROCK Pi 4 has a 40-pin expansion header. Each pin is distinguished by color.
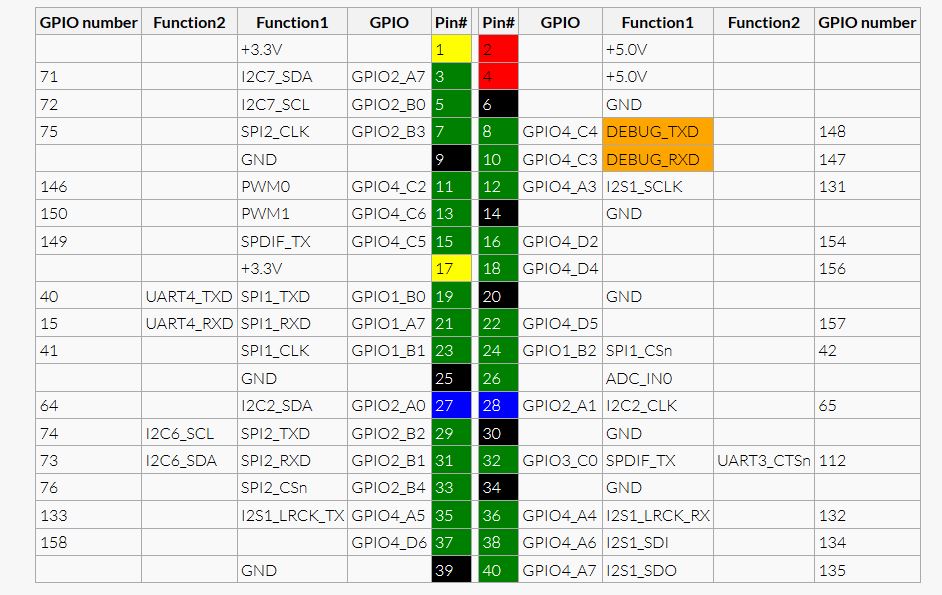
RK3399 have three IO voltages, 1.8V/3.0V/3.3V. For ROCK Pi 4, below is the default voltage:
| GPIO       | Voltage Level | Tolerance |
| ---------- | ------------- | --------- |
| GPIO3_C0   | 3.3V          | 3.465V    |
| ADC_IN0    | 1.8V          | 1.98V     |
| Other GPIO | 3.0V          | 3.14V     |
GPIO number
Rockchip RK3399 GPIO has 5 banks, GPIO0 to GPIO4, each bank has 32pins, naming as below:
   GPIO0_A0 ~ A7
   GPIO0_B0 ~ B7
   GPIO0_C0 ~ C7
   GPIO0_D0 ~ D7

   GPIO1_A0 ~ A7
   ....
   GPIO1_D0 ~ D7
For Rockchip 4.4 kernel, the GPIO number can be calculated as below, take GPIO4_D5(PIN22 on 40PIN GPIO) as an example:
GPIO4_D5 = 32*4 + 8*3 + 5 = 157
To set GPIO4_D5 output
   cd /sys/class/gpio
   echo 157 > export
   cd gpio157
   echo out > direction
   echo 1 > value     # output high
   echo 0 > value     # output low
Rock Pi 4 Tutorials : Write image to SPI flash from USB OTG port
n this tutorial we (RockPi 4) write image to SPI flash from USB OTG portt. ROCK Pi supports maskrom mode, which is a special running mode the CPU is waiting for command from USB OTG port. The PC tool we use to communicate with ROCK Pi in maskrom mode is rkdevelop tool, an open source tool by Rockchip.
Requirement
- ROCK Pi 4 mainboard
- SPI flash soldered on ROCK Pi 4
- Power adapter
- USB Male A to Male A cable(important) USB-C has been seen as not working, an adaptor for USB-C to USB-A has worked. See discussion.
Make sure rkdeveloptool is set up on host computer
Linux
To build rkdeveloptool on a debain based Linux distribution, follow the instruction below:
Install build dependecy:
sudo apt-get install libudev-dev libusb-1.0-0-dev dh-autoreconf
Clone the source code and build:
 git clone https://github.com/rockchip-linux/rkdeveloptool
 cd rkdeveloptool
 autoreconf -i
 ./configure
 make
If you encounter compile error like below
   ./configure: line 4269: syntax error near unexpected token `LIBUSB1,libusb-1.0'
   ./configure: line 4269: `PKG_CHECK_MODULES(LIBUSB1,libusb-1.0)'
You should install pkg-config libusb-1.0
sudo apt-get install pkg-config libusb-1.0
Then re-run
   autoreconf -i
   ./configure
   make
Now you have rkdeveloptool executable at the current directory.
sudo cp rkdeveloptool /usr/local/bin/
MacOS
To build rkdeveloptool on macOS, you need homebrew(or similar package manager) to install required packages.
Install build dependency:
brew install automake autoconf libusb
Clone the source code and build:
   git clone https://github.com/rockchip-linux/rkdeveloptool
   cd rkdeveloptool
   autoreconf -i
   ./configure
   make
If you encounter compile error like below
   ./configure: line 4269: syntax error near unexpected token `LIBUSB1,libusb-1.0'
   ./configure: line 4269: `PKG_CHECK_MODULES(LIBUSB1,libusb-1.0)'
You should install pkg-config libusb-1.0
brew install pkg-config
Then re-run
   autoreconf -i
   ./configure
   make
Now you have rkdeveloptool executable at the current directory.
sudo cp rkdeveloptool /usr/local/bin/
Boot the board to maskrom mode
Empty SPI flash
To boot ROCK Pi into maskrom mode is simple, you don’t need to press any key
- Power off the board and remove any bootable storage media, remove microSD card, remove eMMC module.
- Plug the USB Male A to Mail A cable to ROCK Pi 4 OTG port(the upper USB3 port), the other side to PC
- Power on the board
Update SPI FLash with bootloader inside
If the SPI flash already contains a bootable bootloader, you need to disable the SPI flash at boot time by shortcut the SPI1_CLK to GND. Use wire to connect PIN 23 and 25. Checkout the Pinout.
Shown as following:
- Use cable to connect PIN23 and PIN25
- Power off the board and remove any bootable storage media, remove microSD card, remove eMMC module.
- Plug the USB Male A to Mail A cable to ROCK Pi 4 OTG port(the upper USB3 port), the other side to PC
- Power on the board
- Remove the cable and disconnect PIN23 and PIN25
Now on your Linux PC, lsusb command show show the following usb devices
Bus 003 Device 005: ID 2207:330c
It means the device is in maskrom mode now.
- Now we can proceed the next step to flash.
Write to SPI flash via USB
On your PC, run the rkdeveloptool
   rkdeveloptool ld        # List the device
   DevNo=1  Vid=0x2207,Pid=0x330c,LocationID=305    Maskrom
Download the SPI loader (flash helper, important) to init the ram and prepare the flashing environment etc. If you don’t have it, you can download it from here
rkdeveloptool db rk3399_loader_spinor_v1.15.114.bin
Write the packed SPI image of u-boot and trust.img, start to write from offset 0.
rkdeveloptool wl 0 /path/to/uboot-trust-spi.img
Reboot the device
rkdeveloptool rd
Now the device should boot from the SPI flash now.
Rock Pi 4 Tutorials : Install VNC server on your ROCK Pi 4 | Connect ROCK Pi via VNC
- Install VNC server
   sudo apt-get install xfce4
   sudo apt-get install vnc4server
   sudo apt-get install xrdp
- Run the VNC server and setting password
sudo vncserver
- Edit the config file
sudo vim ~/.vnc/xstartup
- Change the contents to:
   #!/bin/sh
   unset SESSION_MANAGER
   unset DBUS_SESSION_BUS_ADDRESS
   [ -x /etc/vnc/xstartup ] && exec /etc/vnc/xstartup
   [ -r $HOME/.Xresources ] && xrdb $HOME/.Xresources
   vncconfig -iconic &
   xfce4-session &
- Restart the vncserver and xrdp
   sudo vncserver -kill :1            #Kill the vncserver process
   sudo vncserver                     #Restart the vncserver
   sudo service xrdp restart          #Restart the xrdp
Install VNC client on your PC run on linux
- Installation
You need a VNC-Viewer-6.19.325-Linux-x64.deb pack click here download it now.
sudo dpkg -i VNC-Viewer-6.19.325-Linux-x64.deb
- Connecting ROCK Pi 4
Power on your ROCK Pi 4 and ensure it connect the network.
Type on your PC:
vncviewer 'this is your ROCK Pi 4's IP address':1
If you don’t known what your ROCK Pi 4’s IP address type this on your ROCK Pi 4 you can see it:
ifconfig #type 'man config' can get help for ifconfig
If your ROCK Pi 4’s IP address is 192.168.31.196 you type vncviewer 192.168.31.196:1 can connect it, and then input your VNC password can open the desktop.
Rock Pi 4 Tutorials : Radxa APT
Radxa APT is the Debian package repository maintained by Radxa to provide ROCK Pi 4 and Rockchip vendor specific package.
To use it, edit your /etc/apt/sources.list and add the following:
For Debian Stretch
deb http://apt.radxa.com/stretch/ stretch main
For Ubuntu bionic
deb http://apt.radxa.com/bionic/ bionic main
Get the pub key
wget -O - apt.radxa.com/stretch/public.key | sudo apt-key add -
Update
sudo apt-get update && sudo apt-get upgrade
Install essential packages:
sudo apt-get install rockchip-overlay rockchip-fstab
Install the latest u-boot
sudo apt-get install rockpi4b-rk-u-boot-lastest
Manually run the u-boot flash script
/usr/local/sbin/rockpi4b_upgrade_bootloader.sh
Type YES to perform the uboot.img flashing.
Install the latest kernel
Now install the latest kernel package and module:
sudo apt-get install linux-base
sudo apt-get install linux-4.4-lastest
After installation, check file /boot/extlinux/extlinux.conf. It lists all kernel version installed in ROCK Pi. The kernel corresponding to the first label is the newest version and the first boot option.
When want to boot your wanted kernel by default, add one line in file /boot/extlinux/extlinux.conf. The format is as follows:
default <label name>
For example,
default kernel-4.4.154-73-rockchip-00007-g155a65a
Save, sync and reboot. Now you boot into the new kernel.
Available kernel packages
belows are the lists of kernels packages.
 version: kernel-4.4.154-59-rockchip-g5e70f14
 packages:
 ├── linux-firmware-image-4.4.154-59-rockchip-g5e70f14
 ├── linux-headers-4.4.154-59-rockchip-g5e70f14
 └── linux-image-4.4.154-59-rockchip-g5e70f14
 verison: kernel-4.4.154-72-rockchip-g6520deb
 packages:
 ├── linux-firmware-image-4.4.154-72-rockchip-g6520deb
 ├── linux-headers-4.4.154-72-rockchip-g6520deb
 └── linux-image-4.4.154-72-rockchip-g6520deb
 version: kernel-4.4.154-73-rockchip-00007-g155a65a
 packages:
 ├── linux-firmware-image-4.4.154-73-rockchip-00007-g155a65a
 ├── linux-headers-4.4.154-73-rockchip-00007-g155a65a
 └── linux-image-4.4.154-73-rockchip-00007-g155a65a
 veersion: kernel-4.4.154-74-rockchip-00012-g0333c19
 packages:
 ├── linux-firmware-image-4.4.154-74-rockchip-00012-g0333c19
 ├── linux-headers-4.4.154-74-rockchip-00012-g0333c19
 └── linux-image-4.4.154-74-rockchip-00012-g0333c19
 verison: kernel-4.4.154-75-rockchip-00013-gcc4fef3
 packages:
 ├── linux-firmware-image-4.4.154-75-rockchip-00013-gcc4fef3
 ├── linux-headers-4.4.154-75-rockchip-00013-gcc4fef3
 ├── linux-image-4.4.154-75-rockchip-00013-gcc4fef3
For latest information visit this – https://wiki.radxa.com/Rockpi4/radxa-apt
Rock Pi 4 Tutorials : ROCK Pi 4 Backup and Restore uSD card or eMMC module
Using Windows
One of the best tools to backup and restore SD cards is Win32 Disk Imager. Download it from SourceForge and install it. BEFORE starting the software, insert your SD card into the SD card reader on your PC. Often this will open the file explorer showing you the contents of part of your SD card, which should look something like this:

This is not the whole of the contents of your SD card – only part of the card contents is readable by Windows. The rest is not readable by your PC.
Once you open Win32 Disk Imager, use the blue folder icon to choose the location and the name of the backup you want to take, and then choose the drive letter for your SD card.

Click on the Read button. The card will then be backed up to your PC.
If you have a problem with your SD card and it becomes unreadable for any reason (e.g. it becomes corrupted), just follow the above instructions, choosing the image you created as the image file, and click on Write to write it back to the SD card. In fact, you can write it back to another SD card of the same size, giving you an exact duplicate.
Using OSX
Insert the SD Card into a card reader on your Mac. Open Terminal and enter the following command to locate your SD Card:
diskutil list
All your disks will be listed, and will look something like below:
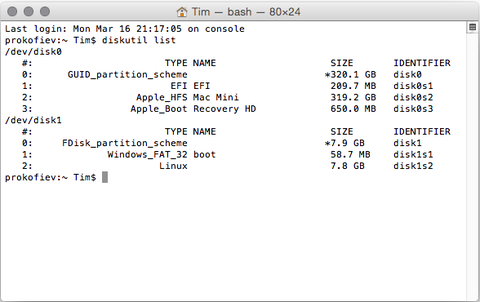
Look for your SD card by looking for a disk of the right size and name. In the above example, the SD Card is /dev/disk1.
Next, in Terminal, enter the following command to create a disc image (.dmg) of your SD Card in your home directory.
sudo dd if=/dev/disk1 of=~/SDCardBackup.dmg
Wait until the SD card has been completely read; the command does not show any feedback, so wait for the command prompt to reappear in the terminal window once it is complete.
Again, if you corrupt your SD card or need to make a copy at any time, you can restore it by following the same approach as above to locate your SD card. Before you can write to the card you have to ‘unmount’ it so that the operating system does not try to write to it at the same time. Use the following in the Terminal:
diskutil unmountDisk /dev/disk1
Then use the this to write the image back to the SD card:
sudo dd if=~/SDCardBackup.dmg of=/dev/disk1
Once it has finished writing the image to the SD card, you can remove it from your Mac using:
sudo diskutil eject /dev/rdisk3
Using Linux
Before inserting the SD card into the reader on your Linux PC, run the following command to find out which devices are currently available:
df -h
Which will return something like this:
Filesystem 1K-blocks Used Available Use% Mounted on
rootfs 29834204 15679020 12892692 55% /
/dev/root 29834204 15679020 12892692 55% /
devtmpfs 437856 0 437856 0% /dev
tmpfs 88432 284 88148 1% /run
tmpfs 5120 0 5120 0% /run/lock
tmpfs 176860 0 176860 0% /run/shm
/dev/mmcblk0p1 57288 14752 42536 26% /boot
Insert the SD card into a card reader and use the same df -h command to find out what is now available:

Filesystem 1K-blocks Used Available Use% Mounted on
rootfs 29834204 15679020 12892692 55% /
/dev/root 29834204 15679020 12892692 55% /
devtmpfs 437856 0 437856 0% /dev
tmpfs 88432 284 88148 1% /run
tmpfs 5120 0 5120 0% /run/lock
tmpfs 176860 0 176860 0% /run/shm
/dev/mmcblk0p1 57288 14752 42536 26% /boot
/dev/sda5 57288 9920 47368 18% /media/boot
/dev/sda6 6420000 2549088 3526652 42% /media/41cd5baa-7a62-4706-b8e8-02c43ccee8d9
The new device that wasn’t there last time is your SD card.
The left column gives the device name of your SD card, and will look like ‘/dev/mmcblk0p1’ or ‘/dev/sdb1’. The last part (‘p1’ or ‘1’) is the partition number, but you want to use the whole SD card, so you need to remove that part from the name leaving ‘/dev/mmcblk0’ or ‘/dev/sdb’ as the disk you want to read from.
Open a terminal window and use the following to backup your SD card:
sudo dd if=/dev/sdb of=~/SDCardBackup.img status=progress
The dd command will show the progress, you just need to wait until the command prompt re-appears.
To restore the image, do exactly the same again to discover which device is your SD card. As with the Mac, you need to unmount it first, but this time you need to use the partition number as well (the ‘p1’ or ‘1’ after the device name). If there is more than one partition on the device, you will need to repeat the umount command for all partition numbers. For example, if the df -h shows that there are two partitions on the SD card, you will need to unmount both of them:
   sudo umount /dev/sdb1
   sudo umount /dev/sdb2
Now you are able to write the original image to the SD drive:
sudo dd bs=4M if=~/SDCardBackup.img of=/dev/sdb status=progress
The bs=4M option sets the ‘block size’ on the SD card to 4Meg. If you get any warnings, then change this to 1M instead, but that will take a little longer to write.
Again, wait while it completes. Before ejecting the SD card, make sure that your Linux PC has completed writing to it using the command:
sudo sync
Rock Pi 4 Tutorials : Setup Docker on Rock Pi 4
Step 1 – Installation
sudo apt-get update
sudo apt-get install apt-transport-https ca-certificates curl software-properties-common
curl -fsSL https://download.docker.com/linux/ubuntu/gpg | sudo apt-key add -
sudo apt-key fingerprint 0EBFCD88
 sudo add-apt-repository  \
    "deb [arch=arm64] https://download.docker.com/linux/ubuntu \
    $(lsb_release -cs) \
    stable"
sudo apt-get update
sudo apt-get install docker-ce
sudo apt-cache madison docker-ce
sudo apt-get install docker-ce=18.06.3~ce~3-0~ubuntu
Step 2 – Check docker service status
sudo service docker status
And it shows this.
 ● docker.service - Docker Application Container Engine
    Loaded: loaded (/lib/systemd/system/docker.service; enabled; vendor preset: enabled)
    Active: active (running) since Sat 2019-03-23 19:35:31 CST; 2min 40s ago
      Docs: https://docs.docker.com
  Main PID: 3625 (dockerd)
     Tasks: 33
    CGroup: /system.slice/docker.service
            ├─3625 /usr/bin/dockerd -H fd://
            └─3647 docker-containerd --config /var/run/docker/containerd/containerd.toml

 Mar 23 19:35:29 linux dockerd[3625]: time="2019-03-23T19:35:29.088391507+08:00" level=info msg="ClientConn switching balancer to \"pick_first\"" module=grpc
 Mar 23 19:35:29 linux dockerd[3625]: time="2019-03-23T19:35:29.088708845+08:00" level=info msg="pickfirstBalancer: HandleSubConnStateChange: 0x4420174e80, CONNECTING" module=grp
 Mar 23 19:35:29 linux dockerd[3625]: time="2019-03-23T19:35:29.091399506+08:00" level=info msg="pickfirstBalancer: HandleSubConnStateChange: 0x4420174e80, READY" module=grpc
 Mar 23 19:35:29 linux dockerd[3625]: time="2019-03-23T19:35:29.091755635+08:00" level=info msg="Loading containers: start."
 Mar 23 19:35:30 linux dockerd[3625]: time="2019-03-23T19:35:30.349854055+08:00" level=info msg="Default bridge (docker0) is assigned with an IP address 172.17.0.0/16. Daemon opt
 Mar 23 19:35:30 linux dockerd[3625]: time="2019-03-23T19:35:30.963182059+08:00" level=info msg="Loading containers: done."
 Mar 23 19:35:31 linux dockerd[3625]: time="2019-03-23T19:35:31.081056747+08:00" level=info msg="Docker daemon" commit=d7080c1 graphdriver(s)=overlay2 version=18.06.3-ce
 Mar 23 19:35:31 linux dockerd[3625]: time="2019-03-23T19:35:31.082035301+08:00" level=info msg="Daemon has completed initialization"
 Mar 23 19:35:31 linux dockerd[3625]: time="2019-03-23T19:35:31.147043288+08:00" level=info msg="API listen on /var/run/docker.sock"
 Mar 23 19:35:31 linux systemd[1]: Started Docker Application Container Engine.
Step 3 – Test
sudo docker run hello-world
Rock Pi 4 Tutorials : ROCK Pi 4 Linux system runs on M.2 NVME SSD
Prerequisites
To follow this tutorial, you will need:
- A well-running ROCK Pi with eMMC or Micro SD Card
- Linux system image for ROCK Pi 4
- SPI Flash image (ROCK Pi 4 u-boot image)
- SPI Flash IC on ROCK Pi 4
- Single power supply voltage range: 2.7~3.6V
- Space: at least 4MB
- M.2 NVME SSD with M.2 NVMe SSD Reader Adapter
- Support brand: HP, Intel, MaxMemory, KingSpec, etc
Step 1 Install ROCK Pi 4 u-boot image to SPI Flash
There are two methods for installing u-boot image to SPI Flash.
Method One: Write image to SPI flash from USB OTG port
Fitrstly, Get ROCK Pi 4 u-boot image from here
Select the target files, called uboot-trust-spi.img and rk3399_loader_spinor_v1.15.114.bin .
Then just follow Write image to SPI flash from USB OTG port to flash image.
Method Two: Write image to SPI flash using mtd tool
This method requires a running system on ROCK Pi 4 board. So now power on the ROCK Pi 4. Maybe your ROCK Pi system is running on eMMC module or uSD card. It is OK.
Firstly, add Radxa APT source. The latest version of u-boot and kernel are still in testing.
For Debian stretch
 $ export DISTRO=stretch-testing # update more frequently but maybe unstable
 $ echo "deb http://apt.radxa.com/$DISTRO/ stretch main" | sudo tee /etc/apt/sources.list.d/apt-radxa-com.list
or Ubuntu server
 $ export DISTRO=bionic-testing # update more frequently but maybe unstable
 $ echo "deb http://apt.radxa.com/$DISTRO/ bionic main" | sudo tee /etc/apt/sources.list.d/apt-radxa-com.list
Get the pub key
$ wget -O - apt.radxa.com/$DISTRO/public.key | sudo apt-key add -
Update APT
$ sudo apt-get update && sudo apt-get upgrade
Install necessary packages
 $ sudo apt-get install -y rockchip-fstab
 $ sudo apt-get install -y rockchip-overlay
 $ sudo apt-get install -y rockpi4-dtbo
 $ sudo apt-get install -y linux-4.4-latest # Will update kernel
 $ sudo apt-get install -y rockpi4b-rk-u-boot-latest # Will get the newest version of u-boot package, but not update the u-boot on eMMC or uSD card
Modify file, /boot/hw_intfc.conf. Uncomment these lines.
 intfc:uart4=off
 intfc:spi1=on
 intfc:dtoverlay=spi1-flash
Reboot the machine.
After login, there is a device /dev/mtd0.
Since we have done a lot of preparation, now it is time to install the image to SPI Flash. Just follow the commands.
$ sudo /usr/local/sbin/rockpi4b_write_spi_flash.sh
After that, something are shown to us.
 Doing this will overwrite data stored on SPI Flash
   and it will require that you use eMMC or SD
   as your boot device.

 Type YES to continue or Ctrl-C to abort.
We follow its suggestion and type YES. Now we just wait until the installation job is done.
Step 2 Install ROCK Pi 4 system image to M.2 NVME SSD
It is convenient to install system image to M.2 NVME SSD.
Put the M.2 NVME SSD into M.2 NVMe SSD Reader Adapter, and then insert them to PC.
When they are ready, use tool command dd or APP Etcher to install system image to M.2 NVME SSD.
Step 3 Test M.2 NVME SSD booting from SPI Flash
Power off ROCK Pi 4, remove eMMC module or uSD Card from ROCK Pi 4 since there is system image in eMMC module or uSD Card.
Insert M.2 NVME SSD into ROCK Pi 4.
Power on ROCK Pi 4.
Rock Pi 4 Tutorials : Armbian | How To use with Rock Pi 4
What is Armbian ?
Armbian is a base operating system platform for single board computers that other projects can trust to build upon.
- Lightweight Debian or Ubuntu based distribution specialized for ARM developing boards.
- Each system is compiled, assembled and optimized by Armbian Build Tools
- It has powerful build and software development tools to make custom builds
- A vibrant community.
Common features
- Debian or Ubuntu based. Compiled from scratch,
- Install images are reduced to actual data size and resized at first boot,
- Root password is
1234. You are forced to change this password and create a normal user at first login, - Ethernet adapter with DHCP and SSH server ready on default port (22)
- Wireless adapter with DHCP ready if present but disabled. You can use armbian-config to connect to your router or create AP
- NAND, SATA, eMMC and USB install script is included (nand-sata-install)
- Upgrades are done via standard apt-get upgrade method
- Login script shows: board name with large text, distribution base, kernel version, system load, up time, memory usage, IP address, CPU temp, drive temp, ambient temp from Temper if exits, SD card usage, battery conditions and number of updates to install.
Performance tweaks
- /var/log is mounted as compressed device (zram, lzo), log2ram service saves logs to disk daily and on shutdown
- half of memory is alocatted/extended for/with compressed swap
- /tmp is mounted as tmpfs (optional compressed)
- browser profile memory caching
- optimized IO scheduler. (check /etc/init.d/armhwinfo)
- journal data writeback enabled. (/etc/fstab)
- commit=600 to flush data to the disk every 10 minutes (/etc/fstab)
- optimized CPU frequency scaling with interactive governor (/etc/init.d/cpufrequtils)
- 480-1010Mhz @Allwinner A10/A20
- 480-1260Mhz @Allwinner H3
- 392-996Mhz @Freescale imx
- 600-2000Mhz @Exynos & S905
- eth0 interrupts are using dedicated core (Allwinner based boards)
Supported boards
Check download page for recently supported list.
How To use Armbian with Rock Pi 4
Check download page for recently released OS images.
Preparation Make sure you have a good & reliable SD card and a proper power supply. Archives can be uncompressed with 7-Zip on Windows, Keka on OS X and 7z on Linux (apt-get install p7zip-full). RAW images can be written with Etcher (all OS). Boot Insert the SD card into the slot, connect a cable to your network if possible or a display and power your board. (First) boot (with DHCP) takes up to 35 seconds with a class 10 SD Card. Login Log in as: root Password: 1234. Then you are prompted to change this password (US-Keyboard setting). When done, you are asked to create a normal user-account for your everyday tasks.
Explore Some Raspberry Pi Tutorials :
- Raspberry Pi – Introduction | Overview | Setup and Management | Tutorials
- piCore (Tiny Core) Linux on Raspberry Pi
- Setup Docker on Raspberry Pi
- Create a Docker Container for Raspberry Pi to Blink an LED
- Raspberry Pi Alternatives in 2019
- How to Install Mosquitto Broker on Raspberry Pi
- Setting up SPI on Raspberry Pi
- Getting Started with The Sense HAT – Raspberry Pi
- Raspberry Pi GPIO Basics
- Controlling LED with Raspberry Pi PART-2
- How To Setup Static IP Address on Raspberry Pi
- Controlling LED with Raspberry Pi
- Interfacing a light Sensor (LDR) with Raspberry Pi
- Remote control your Raspberry Pi from your PC with VNC!
- How To Use Raspberry pi in a truely headless mode
- ROCK Pi 4 : Overview | Installation
- Best OS for Raspberry Pi
- How to setup Bluetooth on a Raspberry Pi 3
- Simple Raspberry Pi Home Security System
- Raspbian – OS For Raspberry Pi
- Setting up a Raspberry Pi headless

Pingback: Rock Pi 4 Tutorials | Getting Started with Rock Pi 4 — IoTbyHVM – Bits & Bytes of IoT – hashstacks
Pingback: Arduino Certification Program | Become Arduino certified!
Pingback: ROCK Pi X : Overview - IoTbyHVM - Bits & Bytes of IoT
Pingback: Radxa Launches Rock Pi N10 RK3999Pro SBC with Integrated NPU
Pingback: Installing sgminer-arm on a Rock Pi 4 - IoTbyHVM - Bits & Bytes of IoT
Pingback: ROCK Pi S Ubuntu | Work with ROCK Pi S Ubuntu
Pingback: Rock Pi Boards | Rock Pi 4 | Rock Pi X | Rock Pi N10 - CompileIoT
Pingback: Use 4G Module on ROCK Pi 4 - IoTbyHVM - Bits & Bytes of IoT
Pingback: Rock Pi Boards | Rock Pi 4 | Rock Pi X | Rock Pi N10 - apalgorithm.com