
ESP32 BLE Tutorials | How to use ESP32 with BLE
In the post we learn some ESP32 BLE Tutorials. We will use Arduino IDE for tutorials, Visit this for Arduino IDE : Arduino IDE | Arduino | Open Source Hardware/Softawre | Arduino Vs RPi. First we add-on ESP 32 on Arduino IDE and then Start ESP32 BLE Tutorials.
Recommended: Best Arduino IDE alternatives to start programming
Getting Started with the ESP32 Development Board
In this post, we’ll be using the ESP32 DEVKIT DOIT board as a reference. But the information on this page is also compatible with other ESP32 development boards with the ESP-WROOM-32 chip.
ESP32 chip specifications –
- The ESP32 is dual core, this means it has 2 processors.
- It has Wi-Fi and bluetooth built-in.
- It runs 32 bit programs.
- The clock frequency can go up to 240MHz and it has a 512 kB RAM.
- This particular board has 30 or 36 pins, 15 in each row.
- It also has wide variety of peripherals available, like: capacitive touch, ADCs, DACs, UART, SPI, I2C and much more.
- It comes with built-in hall effect sensor and built-in temperature sensor.
Programming Environments
The ESP32 can be programmed in different programming environments. You can use: Arduino IDE, Espressif IDF (IoT Development Framework), Micropython, JavaScript, LUA etc.
Installing the ESP32 Board in Arduino IDE
First install or update latest Arduino IDE from arduino.cc/en/Main/Software. There’s an add-on for the Arduino IDE allows you to program the ESP32 using the Arduino IDE and its programming language.
IMPORTANT NOTE:
- If this is your first time installing the ESP32 on the Arduino IDE, simply follow the installation procedure described below;
- If you’ve already installed the ESP32 add-on using the old method, you should remove the espressif folder first. Go to the end of this post to learn how to remove the espressif folder.
1. Installing the ESP32 Board
To install the ESP32 board in your Arduino IDE, follow these next instructions:
1) Open the preferences window from the Arduino IDE. Go to File> Preferences
2) Enter https://dl.espressif.com/dl/package_esp32_index.json into the “Additional Board Manager URLs” field as shown in the figure below. Then, click the “OK” button:

Note: if you already have the ESP8266 boards URL, you can separate the URLs with a comma as follows:
https://dl.espressif.com/dl/package_esp32_index.json, http://arduino.esp8266.com/stable/package_esp8266com_index.json
3) Open boards manager. Go to Tools > Board > Boards Manager…

4) Search for ESP32 and press install button for the “ESP32 by Espressif Systems“:

5) That’s it. It should be installed after a few seconds.
2. Deleting the espressif folder
If this is your first time installing the ESP32 on Arduino IDE you can ignore this section.
If you’ve followed the older installation procedure and you’ve manually installed the ESP32 add-on with Git GUI, you need to remove the espressif folder from your Arduino IDE.
To find your espressif folder and Arduino IDE location (installation path), open your Arduino IDE and go to File > Preferences:
Copy the location from the “Sketchbook location” field:
Go to your Arduino IDE location directory: C:\Users\hvm\Documents\Arduino and open the hardware folder:
Then, delete the espressif folder:
Testing the Installation
Plug the ESP32 board to your computer. Then, follow these steps:
1) Open the Arduino IDE
2) Select your Board in Tools > Board menu (in my case it’s the DOIT ESP32 DEVKIT V1)

3) Select the Port (if you don’t see the COM Port in your Arduino IDE, you need to install the ESP32 CP210x USB to UART Bridge VCP Drivers):
4) Open the following example under File > Examples > WiFi (ESP32) > WiFi Scan
5) A new sketch open in new window
6) Press the Upload button in the Arduino IDE. Wait a few seconds while the code compiles and uploads to your board.
7) If everything went as expected, you should see a “Done uploading.” message.
8) Open the Arduino IDE Serial Monitor at a baud rate of 115200:
9) Press the ESP32 on-board Enable button and you should see the networks available near your ESP32
Done!
ESP32 Pinout
The ESP32 has more GPIOs with more functionalities compared with the ESP826. With the ESP32 you can decide which pins are UART, I2C, or SPI – you just need to set that on the code. This is possible due to the ESP32 chip’s multiplexing feature that allows to assign multiple functions to the same pin. If you don’t set them on the code, the pins will be used as default
Version with 30 GPIOs
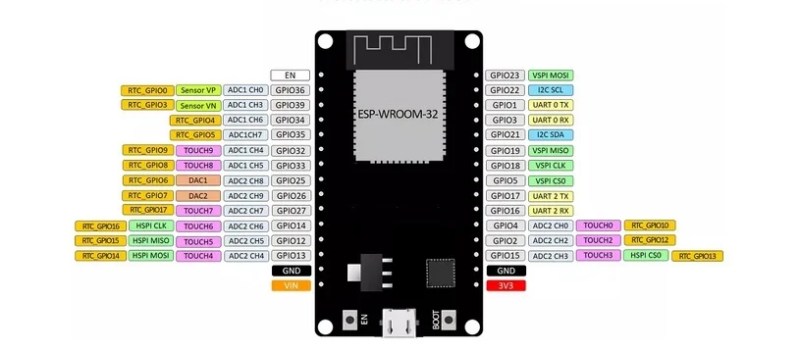
Version with 36 GPIOs
What is Bluetooth Low Energy?
Bluetooth Low Energy, BLE for short, is a power-conserving variant of Bluetooth. BLE’s primary application is short distance transmission of small amounts of data (low bandwidth). Unlike Bluetooth that is always on, BLE remains in sleep mode constantly except for when a connection is initiated.
This makes it consume very low power. BLE consumes approximately 100x less power than Bluetooth (depending on the use case).
Take a look at the table below that compares BLE and Bluetooth in more detail.
| Bluetooth Low Energy (LE) | Bluetooth Basic Rate/ Enhanced Data Rate (BR/EDR) |
|
|---|---|---|
| Optimized For… | Short burst data transmission | Continuous data streaming |
| Frequency Band | 2.4GHz ISM Band (2.402 – 2.480 GHz Utilized) | 2.4GHz ISM Band (2.402 – 2.480 GHz Utilized) |
| Channels | 40 channels with 2 MHz spacing (3 advertising channels/37 data channels) |
79 channels with 1 MHz spacing |
| Channel Usage | Frequency-Hopping Spread Spectrum (FHSS) | Frequency-Hopping Spread Spectrum (FHSS) |
| Modulation | GFSK | GFSK, π/4 DQPSK, 8DPSK |
| Power Consumption | ~0.01x to 0.5x of reference (depending on use case) |
1 (reference value) |
| Data Rate | LE 2M PHY: 2 Mb/s LE 1M PHY: 1 Mb/s LE Coded PHY (S=2): 500 Kb/s LE Coded PHY (S=8): 125 Kb/s |
EDR PHY (8DPSK): 3 Mb/s EDR PHY (π/4 DQPSK): 2 Mb/s BR PHY (GFSK): 1 Mb/s |
| Max Tx Power* | Class 1: 100 mW (+20 dBm) Class 1.5: 10 mW (+10 dbm) Class 2: 2.5 mW (+4 dBm) Class 3: 1 mW (0 dBm) |
Class 1: 100 mW (+20 dBm) Class 2: 2.5 mW (+4 dBm) Class 3: 1 mW (0 dBm) |
| Network Topologies | Point-to-Point (including piconet) Broadcast Mesh |
Point-to-Point (including piconet) |
for more information please visit https://www.bluetooth.com/
ESP32 BLE Tutorials
BLE with ESP32
The ESP32 can act as a BLE server or as a BLE client. There are several BLE examples for the ESP32 in the ESP32 BLE library for Arduino IDE. This library comes installed by default when you install the ESP32 on the Arduino IDE.
In your Arduino IDE, you can go to File > Examples > ESP32 BLE Arduino and explore the examples that come with the BLE library.
Note: to see the ESP32 examples, you must have the ESP32 board selected on Tools > Board. and Select correct port.
ESP32 BLE Server
To create an ESP32 BLE Server, open your Arduino IDE and go to File > Examples > ESP32 BLE Arduino and select the BLE_server example.
I explain Code how the Code Works
For creating a BLE server, the code should follow the next steps:
- Create a BLE Server. In this case, the ESP32 acts as a BLE server.
- Create a BLE Service.
- Create a BLE Characteristic on the Service.
- Create a BLE Descriptor on the Characteristic.
- Start the Service.
- Start advertising, so it can be found by other devices.
How the code works
Let’s take a quick look at how the BLE server example code works.
It starts by importing the necessary libraries for the BLE capabilities.
#include <BLEDevice.h>
#include <BLEUtils.h>
#include <BLEServer.h>
Then, you need to define a UUID for the Service and Characteristic.
#define SERVICE_UUID "4fafc201-1fb5-459e-8fcc-c5c9c331914b"
#define CHARACTERISTIC_UUID "beb5483e-36e1-4688-b7f5-ea07361b26a8"
You can leave the default UUIDs, or you can go to uuidgenerator.net to create random UUIDs for your services and characteristics.
In the setup(), it starts the serial communication at a baud rate of 115200.
Serial.begin(115200);
Then, you create a BLE device called “MyESP32”. You can change this name to whatever you like.
// Create the BLE Device
BLEDevice::init("MyESP32");
In the following line, you set the BLE device as a server.
BLEServer *pServer = BLEDevice::createServer();
After that, you create a service for the BLE server with the UUID defined earlier.
BLEService *pService = pServer->createService(SERVICE_UUID);
Then, you set the characteristic for that service. As you can see, you also use the UUID defined earlier, and you need to pass as arguments the characteristic’s properties. In this case, it’s: READ and WRITE.
BLECharacteristic *pCharacteristic = pService->createCharacteristic(
                                     CHARACTERISTIC_UUID,
                                     BLECharacteristic::PROPERTY_READ |
                                     BLECharacteristic::PROPERTY_WRITE
                                     );
After creating the characteristic, you can set its value with the setValue() method.
pCharacteristic->setValue("Hello World says Neil");
In this case we’re setting the value to the text “Hello World says Neil”. You can change this text to whatever your like. In future projects, this text can be a sensor reading, or the state of a lamp, for example.
Finally, you can start the service, and the advertising, so other BLE devices can scan and find this BLE device.
BLEAdvertising *pAdvertising = pServer->getAdvertising();
pAdvertising->start();
This is just a simple example on how to create a BLE server. In this code nothing is done in the loop(), but you can add what happens when a new client connects (check the BLE_notify example for some guidance).
ESP32 BLE Scanner
Creating an ESP32 BLE scanner is simple. Grab another ESP32 (while the other is running the BLE server sketch). In your Arduino IDE, go to File > Examples > ESP32 BLE Arduino and select the BLE_scan example.
Once the code is uploaded and you should have the two ESP32 boards powered on:
- One ESP32 with the “BLE_server” sketch;
- Other with ESP32 “BLE_scan” sketch.
Go to the Serial Monitor with the ESP32 running the “BLE_scan” example, press the ESP32 (with the “BLE_scan” sketch) ENABLE button to restart and wait a few seconds while it scans.
Testing the ESP32 BLE Server with Your Smartphone
Download BLE Scanner App https://play.google.com/store/apps/details?id=com.macdom.ble.blescanner&hl=en_IN Or use nRF Connect for Mobile Apphttps://play.google.com/store/apps/details?id=no.nordicsemi.android.mcp&hl=en_IN
ESP32 BLE on Arduino IDE with UART Test | ESP32 BLE tutorials
Flash this code in ESP32 Board
/*
   Create a BLE server that, once we receive a connection, will send periodic notifications.
   The service advertises itself as: 6E400001-B5A3-F393-E0A9-E50E24DCCA9E
   Has a characteristic of: 6E400002-B5A3-F393-E0A9-E50E24DCCA9E - used for receiving data with "WRITE"
   Has a characteristic of: 6E400003-B5A3-F393-E0A9-E50E24DCCA9E - used to send data with  "NOTIFY"

   The design of creating the BLE server is:
   1. Create a BLE Server
   2. Create a BLE Service
   3. Create a BLE Characteristic on the Service
   4. Create a BLE Descriptor on the characteristic
   5. Start the service.
   6. Start advertising.

   In this example rxValue is the data received (only accessible inside that function).
   And txValue is the data to be sent, in this example just a byte incremented every second.
*/
#include <BLEDevice.h>
#include <BLEServer.h>
#include <BLEUtils.h>
#include <BLE2902.h>
BLECharacteristic *pCharacteristic;
bool deviceConnected = false;
float txValue = 0;
const int readPin = 32; // Use GPIO number. See ESP32 board pinouts
const int LED = 25; // Could be different depending on the dev board. I used the DOIT ESP32 dev board.

//std::string rxValue; // Could also make this a global var to access it in loop()

// See the following for generating UUIDs:
// https://www.uuidgenerator.net/

#define SERVICE_UUID           "6E400001-B5A3-F393-E0A9-E50E24DCCA9E" // UART service UUID
#define CHARACTERISTIC_UUID_RX "6E400002-B5A3-F393-E0A9-E50E24DCCA9E"
#define CHARACTERISTIC_UUID_TX "6E400003-B5A3-F393-E0A9-E50E24DCCA9E"

class MyServerCallbacks: public BLEServerCallbacks {
    void onConnect(BLEServer* pServer) {
      deviceConnected = true;
    };

    void onDisconnect(BLEServer* pServer) {
      deviceConnected = false;
    }
};

class MyCallbacks: public BLECharacteristicCallbacks {
    void onWrite(BLECharacteristic *pCharacteristic) {
      std::string rxValue = pCharacteristic->getValue();

      if (rxValue.length() > 0) {
        Serial.println("*********");
        Serial.print("Received Value: ");

        for (int i = 0; i < rxValue.length(); i++) { Serial.print(rxValue[i]); } Serial.println(); // Do stuff based on the command received from the app if (rxValue.find("ON") != -1) { Serial.println("Turning ON!"); digitalWrite(LED, HIGH); } else if (rxValue.find("OFF") != -1) { Serial.println("Turning OFF!"); digitalWrite(LED, LOW); } Serial.println(); Serial.println("*********"); } } }; void setup() { Serial.begin(115200); pinMode(LED, OUTPUT); // Create the BLE Device BLEDevice::init("ESP32 UART Test"); // Give it a name // Create the BLE Server BLEServer *pServer = BLEDevice::createServer(); pServer->setCallbacks(new MyServerCallbacks());

  // Create the BLE Service
  BLEService *pService = pServer->createService(SERVICE_UUID);

  // Create a BLE Characteristic
  pCharacteristic = pService->createCharacteristic(
                      CHARACTERISTIC_UUID_TX,
                      BLECharacteristic::PROPERTY_NOTIFY
                    );

  pCharacteristic->addDescriptor(new BLE2902());

  BLECharacteristic *pCharacteristic = pService->createCharacteristic(
                                         CHARACTERISTIC_UUID_RX,
                                         BLECharacteristic::PROPERTY_WRITE
                                       );

  pCharacteristic->setCallbacks(new MyCallbacks());

  // Start the service
  pService->start();

  // Start advertising
  pServer->getAdvertising()->start();
  Serial.println("Waiting a client connection to notify...");
}

void loop() {
  if (deviceConnected) {
    // Fabricate some arbitrary junk for now...
    txValue = analogRead(readPin) / 3.456; // This could be an actual sensor reading!

    // Let's convert the value to a char array:
    char txString[8]; // make sure this is big enuffz
    dtostrf(txValue, 1, 2, txString); // float_val, min_width, digits_after_decimal, char_buffer

//    pCharacteristic->setValue(&txValue, 1); // To send the integer value
//    pCharacteristic->setValue("Hello!"); // Sending a test message
    pCharacteristic->setValue(txString);

    pCharacteristic->notify(); // Send the value to the app!
    Serial.print("*** Sent Value: ");
    Serial.print(txString);
    Serial.println(" ***");

    // You can add the rxValue checks down here instead
    // if you set "rxValue" as a global var at the top!
    // Note you will have to delete "std::string" declaration
    // of "rxValue" in the callback function.
//    if (rxValue.find("ON") != -1) {
//      Serial.println("Turning ON!");
//      digitalWrite(LED, HIGH);
//    }
//    else if (rxValue.find("OFF") != -1) {
//      Serial.println("Turning OFF!");
//      digitalWrite(LED, LOW);
//    }
  }
  delay(1000);
}
Pin Diagram
Now Connect a LED with ESP 32 Board.
+ ===========> PIN 25
– ===========> GND
Now Install BLE Scanner Android App (Link given above) and connect with ESP32 UART Test and click on RX UUID.
Here Type ON for Turn On LED and Type OFF for Turn Off LED.
Remember :
The service advertises itself as: 6E400001-B5A3-F393-E0A9-E50E24DCCA9E
Has a characteristic of: 6E400002-B5A3-F393-E0A9-E50E24DCCA9E – used to send data with “write”
Has a characteristic of: 6E400003-B5A3-F393-E0A9-E50E24DCCA9E – used for receiving data with “notify”
Download an android appin your mobile BLE Scanner App https://play.google.com/store/apps/details?id=com.macdom.ble.blescanner&hl=en_IN
Or you can use another app nRF Connect for Mobile App
https://play.google.com/store/apps/details?id=no.nordicsemi.android.mcp&hl=en_IN
ESP32 BLE with DHT11 | ESP32 BLE tutorials
The program basically sets the UUID of the UART communication service, it reads the humidity and temperature of the DHT sensor, and transmits this data to the application on the mobile phone. Data is sent in a single variable, but in a CSV format, with temperature and humidity separated by a comma.
#include <BLEDevice.h>
#include <BLEServer.h>
#include <BLEUtils.h>
#include <BLE2902.h>
#include <DHT.h>
#include <iostream>
#include <string>
 BLECharacteristic * pCharacteristic;

 bool deviceConnected = false;
 const int LED = 25;  // Could be different depending on the dev board.  I used the DO32 ESP32 dev board.

 /*
  * Definition of DHT11
  */
 #define DHTPIN 23 // DHT11 data pin
 #define DHTTYPE DHT11 // sets the sensor type, in case DHT11

 DHT dht (DHTPIN, DHTTYPE);

 int humidity;
 int temperature;

 // See the following link if you want to generate your own UUIDs:
 // https://www.uuidgenerator.net/

 #define SERVICE_UUID "6E400001-B5A3-F393-E0A9-E50E24DCCA9E" // UART service UUID
 #define CHARACTERISTIC_UUID_RX "6E400002-B5A3-F393-E0A9-E50E24DCCA9E"
 #define DHTDATA_CHAR_UUID "6E400003-B5A3-F393-E0A9-E50E24DCCA9E"


 class MyServerCallbacks: public BLEServerCallbacks {
     void onConnect (BLEServer * pServer) {
       deviceConnected = true;
     };

     void onDisconnect (BLEServer * pServer) {
       deviceConnected = false;
     }
 };

 class MyCallbacks: public BLECharacteristicCallbacks {
     void onWrite (BLECharacteristic * pCharacteristic) {
       std :: string rxValue = pCharacteristic-> getValue ();
       Serial.println (rxValue [0]);

       if (rxValue.length ()> 0) {
         Serial.println ("*********");
         Serial.print ("Received Value:");

         for (int i = 0; i  setCallbacks (new MyServerCallbacks ());

   // Create the UART service
   BLEService * pService = pServer-> createService (SERVICE_UUID);

   // Create a BLE Feature to send the data
   pCharacteristic = pService-> createCharacteristic (
                       DHTDATA_CHAR_UUID,
                       BLECharacteristic :: PROPERTY_NOTIFY
                     );

   pCharacteristic-> addDescriptor (new BLE2902 ());

   // creates a BLE characteristic to receive the data
   BLECharacteristic * pCharacteristic = pService-> createCharacteristic (
                                          CHARACTERISTIC_UUID_RX,
                                          BLECharacteristic :: PROPERTY_WRITE
                                        );

   pCharacteristic-> setCallbacks (new MyCallbacks ());

   // Start the service
   pService-> start ();

   // Starts the discovery of ESP32
   pServer-> getAdvertising () -> start ();
   Serial.println ("Waiting for a client to connect ...");
 }

 void loop () {
   if (deviceConnected) {

     humidity = dht.readHumidity ();
     temperature = dht.readTemperature ();
     // test if return is valid, otherwise something is wrong.
     if (isnan (temperature) || isnan (humidity))
     {
       Serial.println ("Failed to read from DHT");
     }
     else
     {
       Serial.print ("Humidity:");
       Serial.print (humidity);
       Serial.print ("% \ t");
       Serial.print ("Temperature:");
       Serial.print (temperature);
       Serial.println ("* C");
     }

     char humidityString [2];
     char temperatureString [2];
     dtostrf (humidity, 1, 2, humidityString);
     dtostrf (temperature, 1, 2, temperatureString);

     char dhtDataString [16];
     sprintf (dhtDataString, "% d,% d", temperature, humidity);

     pCharacteristic-> setValue (dhtDataString);

     pCharacteristic-> notify ();  // Send the value to the application!
     Serial.print ("*** Sent Data:");
     Serial.print (dhtDataString);
     Serial.println ("***");
   }
   delay (1000);
 }
Pin Diagram
For LED –
+ =====> PIN 25– =====> GNDFor DHT 11 Sensor-
VCC =====> 3.3 V
DATA =====> PIN 23
GND =====> GND
Now Open BLE Scanner Android App and connect with “ESP32 DHT 11” and click on UUID “6E400003-B5A3-F393-E0A9-E50E24DCCA9E for Notifictaion.
Use UUID_RX “6E400002-B5A3-F393-E0A9-E50E24DCCA9E for write data. send A for turn on led andsend B for turn off led.
OR you can use nRF Connect for Mobile App.
In summary, in this tutorial we’ve shown you ESP32 BLE Tutorials | How to use ESP32 with BLE with Arduino IDE. I hope you like this ESP32 BLE Tutorials post. Do you have any questions? Leave a comment down below!
Thanks for reading. If you like this post probably you might like my next ones, so please support me by subscribing my blog.
We have other tutorials with ESP32 that you may find useful:
- Dynamic WLAN configuration for ESP32 Board | AutoConnect
- ArduinoOTA ESP32: Wi-Fi (OTA) Wireless Update from the Arduino IDE
- ESP32 with LoRa using Arduino IDE
- How To Use Grove-LCD RGB Backlight with NodeMCU
- NodeMcu to DHT Interface in Blynk app
- How To ON/OFF a bulb by Google voice assistant
- Arduino IDE | Arduino | Open Source Hardware/Softawre | Arduino Vs RPi
- WiFi LoRA 32 (V2) ESP32 | Overview | Introduction
- DHT11 sensor with ESP8266/NodeMCU using Arduino IDE
- Arduino Support for ESP8266 with simple test code
You may like also:


Pingback: ESP32 BLE Tutorials | How to use ESP32 with BLE — IoTbyHVM – Explore TechBytes – hashstacks
Pingback: ESP32 Tutorials | ESP32 BLE | ESP32 add-on Arduino IDE | How To Use
Pingback: ESP32 BLE Tutorials | How to use ESP32 with BLE | Podex' Tagebuch
Your code doesn’t work when copied and pasted. You are missing something.
Okay let me check.
Can you tell me your errors here.
Maybe I have a solution.
Thanks for the information. I have tried your code using Max30100 sensor to get HR n SpO2 value. But getting only 0 value. Can you write another prog with Max30100 ? thanks
I don’t have Max30100.
Please send me your program at Iotbyhvm@gmail.com. I will try to find out your problem.
can we send data from ESP32 to Raspberry pi through BLE?
Yes sure