
Getting Started with Radxa Zero
adxa Zero is an ultra thin SBC in small form factor with powerful performance based on Amlogic S905Y2. It can run Android and selected Linux distributions. Radxa Zero features a quad core 64-bit ARM processor, up to 4GB 32bit LPDDR4 memory, HDMI output at 4K@60, WiFi and Bluetooth connectivity, USB 3.0, and 40-pin GPIO header. Additionally, the power port can also be used for USB 2.0 OTG to connect more peripheral.
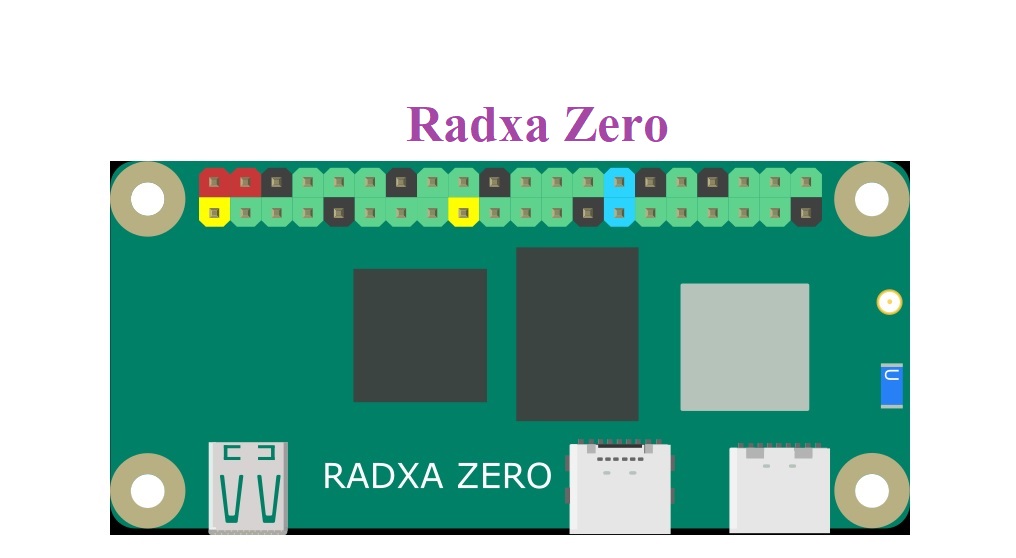
For more details please visit this : https://iotbyhvm.ooo/radxa-zero-gpio-pinout-specs/
Radxa Zero can boot from either eMMC or microSD Card. However, for beginner it’s best to stick with your board’s default storage, i.e. use eMMC when it is present, and microSD when eMMC is not available. This avoids the need to update U-Boot configuration to boot your chosen device, which can be challenging for the beginner.
Starting the board for the first time
Choose your storage option
- Flash image to eMMC
If you want to install another OS to eMMC, you will first need to erase the eMMC, then you can install any supported Linux distros from Radxa download page.
- Flash image to microSD card
Please follow the guide below.
Write Image
- Put the microSD card into your host computer.
- Download the flash tool,
balenaEtcher, from their GitHub release. Choose the version that suits your host operation system. In this guide we are using Ubuntu with Etcher 1.4.5. Later version can be operated similarly.
- After unpacking the package, launch balenaEtcher with following command:
$ ./etcher-etcher-electron-1.4.5-x86_64.AppImage
If you get an error message No polkit authentication agent found you can try and start it with sudo, but do know that this is running the tool as root.
- Click Select image to choose your system image.

- IClick Select Drive to select your microSD card. Please read your options carefully, as you may lose precious data when choosing a wrong drive!
- Click Flash to begin the flashing process.
- Once the window shows
Flash Complete!you can now safely remove the microSD card from your host computer.

Boot
- To boot from microSD card, put flashed card into your Radxa Zero.
- To boot from eMMC, eject Radxa Zero from your host PC and unplug the USB-C cable from host PC.
- Connect Radxa Zero to your display with the HDMI cable. Make sure the display’s input source is correctly set to your Radxa Zero.
- Connect the USB-C hub with keyboard and mouse to your Radxa Zero.
- Connect the power supply to your Radxa Zero. The board will boot immediately.
Reference : https://wiki.radxa.com/


But Why buy this when you can use a Raspberry Pi? That is the question. The only thing that I have seen in a quick look is the on-board memory. Nothing about availability, price or distributors. Ony half an article.